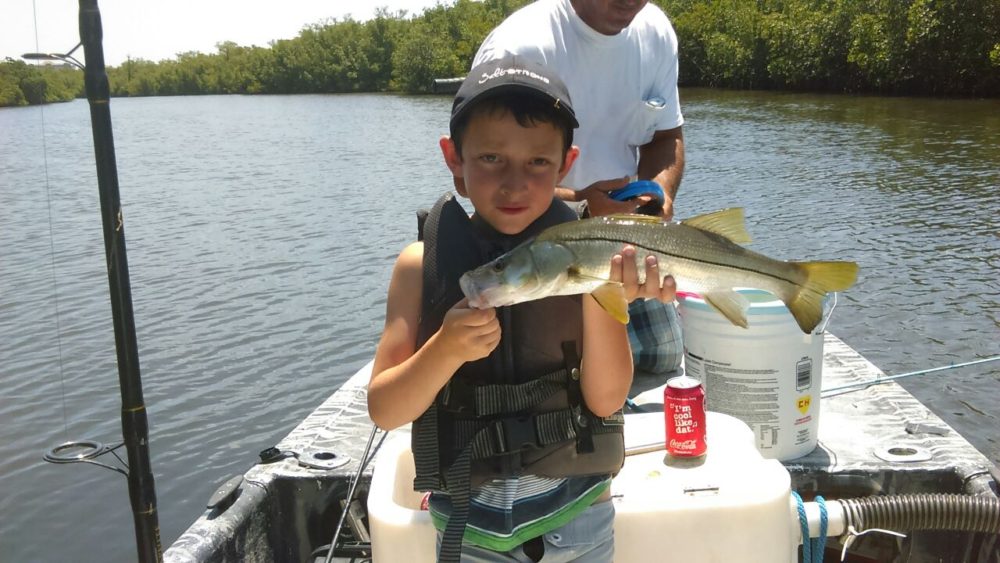
Exploring new areas is often rewarding. It mixes things up from fishing the same areas that you always seem to gravitate to, and you might just find your new favorite spot, or at least one to add to the list.
That’s exactly what I did on a recent trip. I went out of my comfort zone and trekked to a new spot. On top of that, I was testing out a new lure. Things started off tough, but it all came together in the end.
In this video, I’ll share a couple of tough breaks (literally) to go along with some solid action and explain how the current trends came into play.
Change Your Perspective in a New Spot
Ready To Finally Fish With Confidence?
Then sign up for our FREE INTERACTIVE Saltwater Fishing School below.
Don’t be afraid to try an area that you have never been to before when it matches the current trends.
Make adjustments as the conditions change until you find what the fish will respond to.
Always look for signs of feeding, it might happen in areas that you do not expect.
Exclusive Member Perks: Major Savings on Premium Fishing Tackle!
Did you know that Salt Strong Members save 20% or more on tackle from our Tackle Shop?
From our purpose-built custom-designed lures to some of the biggest brand names in inshore fishing, we have the gear you need to catch more fish in less time AND save money doing it!
When you’re ready to upgrade your reel, rod, or pick up a new combo, we’ve got you covered there as well.
In fact, many Members save more on tackle and gear than they spend on their memberships, making it a no-brainer!
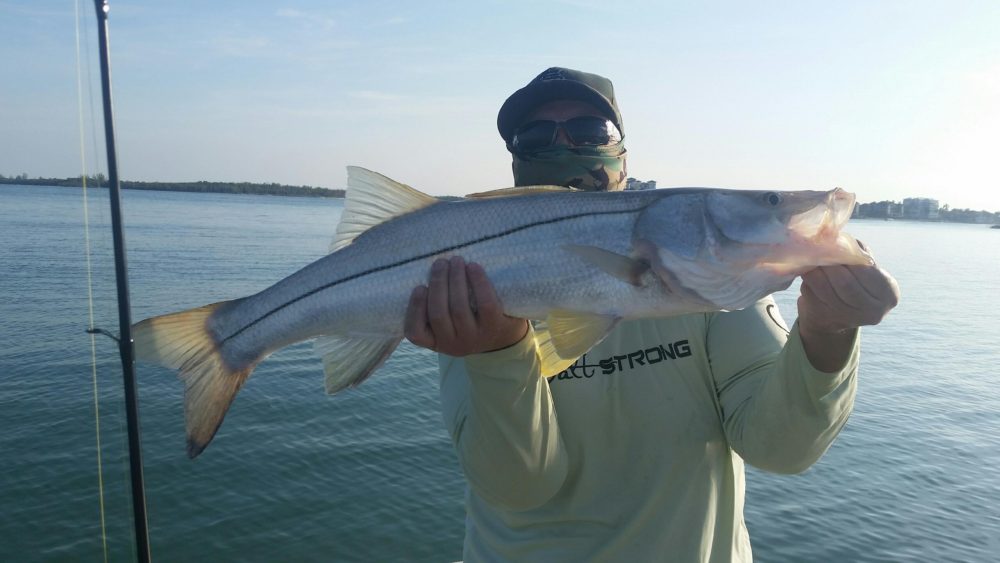
Fishing during periods of more than normal high water can be challenging to say the least. Not only do fish move from their normal areas, but the source of the high water can create different reactions.
In this video, we will go over the two main types of high water situations and I’ll give you some tips on how to find the catchable fish during these times.
High Water Tactics
Ready To Finally Fish With Confidence?
Then sign up for our FREE INTERACTIVE Saltwater Fishing School below.
When the high water is due to high winds and/or spring tides…
Redfish tend to push as far back as they can and feed in areas they normally can’t reach. If you can’t get to those areas, try vertical structure or thick grass lines that can keep them from moving back.
Trout usually hold in similar depths and structures but will often move to find cleaner water.
Flounder also like clean water, but still tend to hang around the same creek mouths and drop-offs even if the water is deeper than normal.
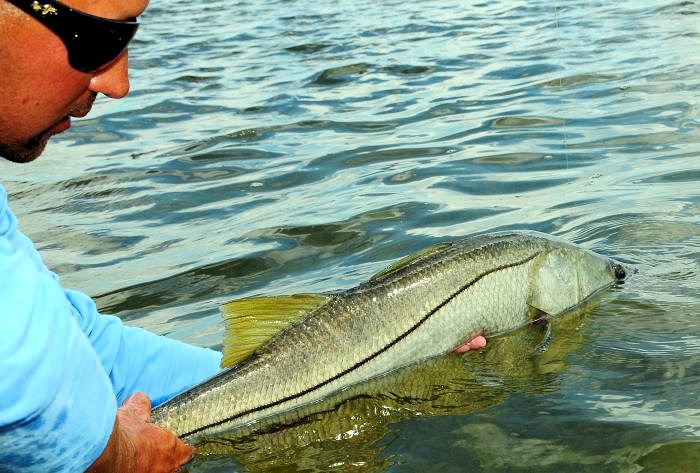
Snook like to push further up under the mangroves, so try targeting docks and seawalls that prevent them from going any further back. As the water recedes, post up on choke points to get into some fantastic snook action.
When high water is due to rainfall that pushes a lot of freshwater into the system…
Move to the outsides of passes and inlets where the salinity is usually higher.
Saltwater is denser and sink below freshwater, so try fishing deeper areas.
Rainwater tends to dirty things up and fish will hold tighter to structure during those times. Cast as close as you can to the structure and be sure to use some scent to help them find your lure.
IMPORTANT REMINDER
The 2 core benefits we promise to Insider Club members is to be able to find and catch fish easier than ever before while saving money on fishing equipment.
So I am including links to the quickest ways to achieve each:
Recently, I picked an area that should have been a good place according to the current trends. The challenge was that I hadn’t been there in a while and thick grass made presenting my lures to fish more difficult.
The fish were there, though, and sight casting ended up being a big key to success. In this video, I’ll show you what to looking for and how to present your lures to help you improve your sight fishing success.
Late Summer Sight Fishing
Ready To Finally Fish With Confidence?
Then sign up for our FREE INTERACTIVE Saltwater Fishing School below.
This time of year, bait can be plentiful. When you get on the water don’t just look for bait, look to see what it’s doing. Are they being chased or are they milling around? Nervous bait indicates predators are nearby.
Keep moving until you see signs of what you’re after. Feeding activity, big wakes/pushes, and tails are all indicators of predator fish.
When you’re sight casting, cast beyond the fish to avoid spooking it with the lure splash.
Also make sure your cast is ahead of the direction the fish is traveling. Work your lure back so the fish finds it on the intercept.
Do you have any questions or feedback? Leave them in the comments below!
Get Involved with a Passionate Community of Inshore Anglers!
We love sharing fishing tips and developing tools to help anglers catch more fish faster, but there’s more to Salt Strong than that. We’re a community of people who are passionate about inshore fishing.
In our Community Feed, Members are able to share what’s working in their local areas, celebrate successes, and get help from Coaches, Staff, and fellow Members.
Better yet, it’s a positive environment where you won’t find the abuse, shame, and language that plagues so many public groups.
If face-to-face relationships are what you crave, our local Chapters are a great place to meet new friends, hear from local guides and guest speakers, connect on conservation efforts, and of course, get even more local intel to improve your fishing success.
We’re constantly working with local Salt Strong Members to create new Chapters and unite inshore anglers around the Gulf of Mexico and all the way up the Atlantic coast!
Become a Salt Strong Member today to get access to our Community Feed and connect with a local Chapter!
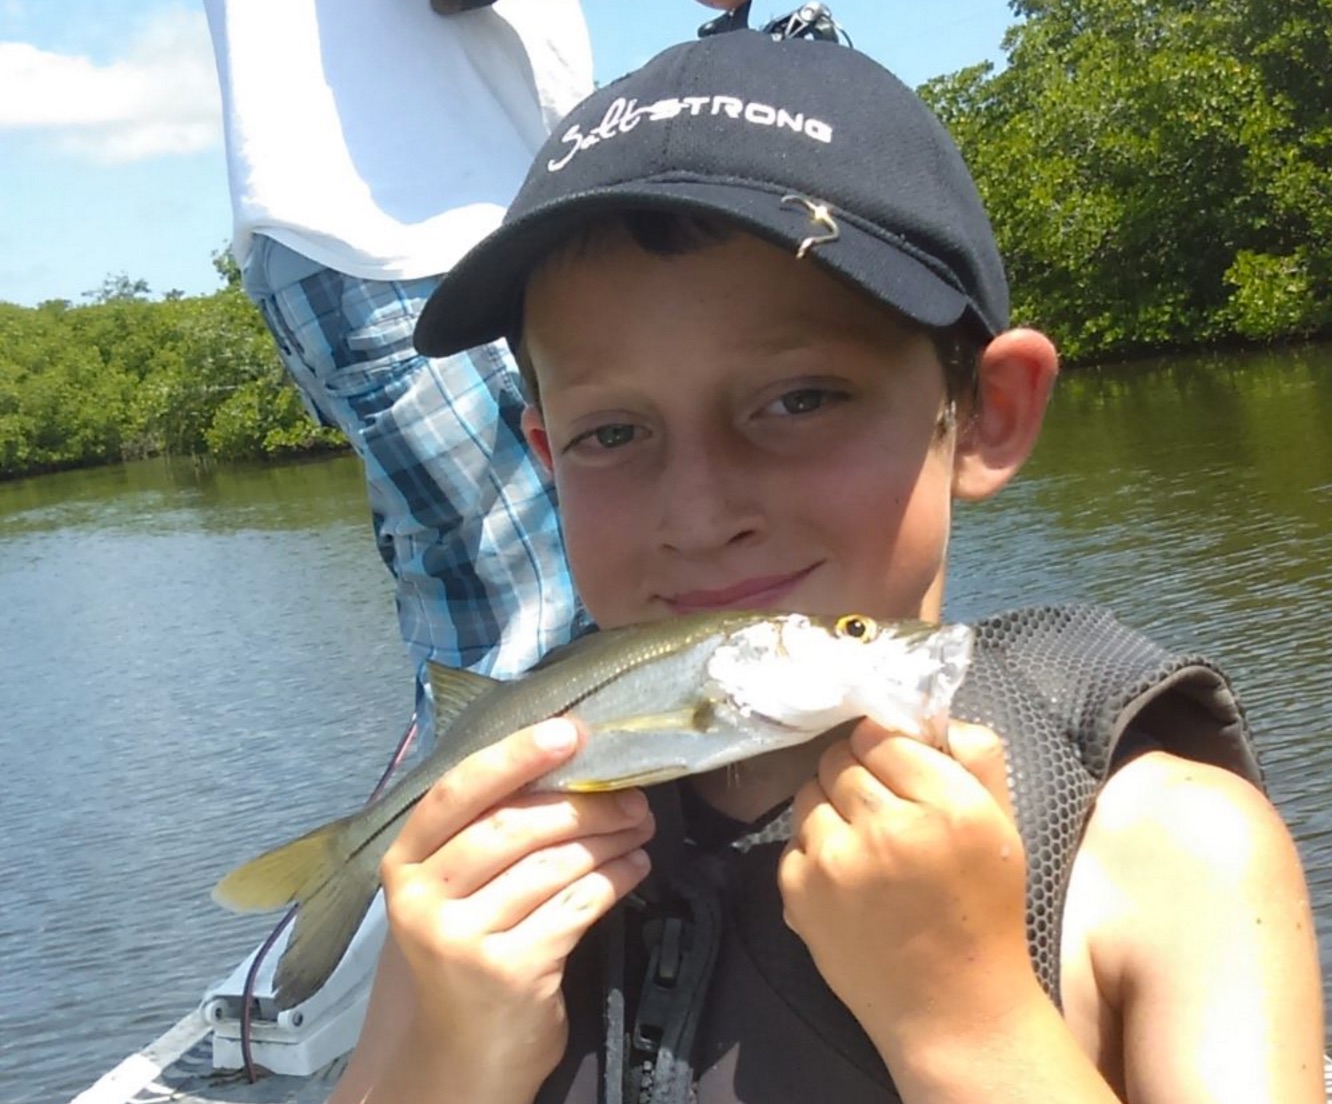
This report shows a surprisingly active fishing trip that I had while I was on vacation with my wife in an area that I have never fished before (Cedar Key).
I brought my boat up since we had an open morning to fish, and it turned out to be a perfect case study example on how to use Smart Fishing Spots to quickly find good fishing grounds in foreign waters.
Below, you’ll see a video that shows some fun on-the-water action with some big snook, sporty redfish, and one of the biggest tripletail I’ve ever caught.
Finding Fish Fast In Cedar Key
0:00 Find New Fishing Spots Intro
1:06 Area Overview
1:26 Big Snook
2:36 Redemption
5:17 Tripletail
6:05 Trip Analysis
Ready To Finally Fish With Confidence?
Then sign up for our FREE INTERACTIVE Saltwater Fishing School below.
The key was to use the Smart Fishing Spots system along with the recent trends as explained in the Weekend Game Plans to identify high-probability spots to target
Once on the water, I specifically looked for zones with schools of mullet to decide exactly where to fish
Lure selection was the final key… started off with the Skinny Lipper to help attract attention in the early hours when the fish were most active. Then changed to subsurface soft plastics once the sun came up and the bite slowed down to help trigger strikes from more lethargic fish.
Not a Member Yet?
Here at Salt Strong, our amazing staff and coaches work tirelessly to provide our Members with everything they need to catch more fish in less time.
While we’re never satisfied and always want to improve, we believe we offer our Members a tremendous value. But don’t just take our word for it. Here’s the very first Community post from one of our new Members:
Best fishing day ever!
Want to say thank you to Salt Strong. I’ve taken my son fishing many times over the years and usually we caught nothing and sometimes we caught a little something but today was a day to top all fishing trips! We lost count and I have Salt Strong to thank for that! Great area, great slam shady, right timing.
– David Peasall, July 2024
So join more than 50,000 other inshore fishing anglers and step up your game while being part of the best saltwater fishing club in America!
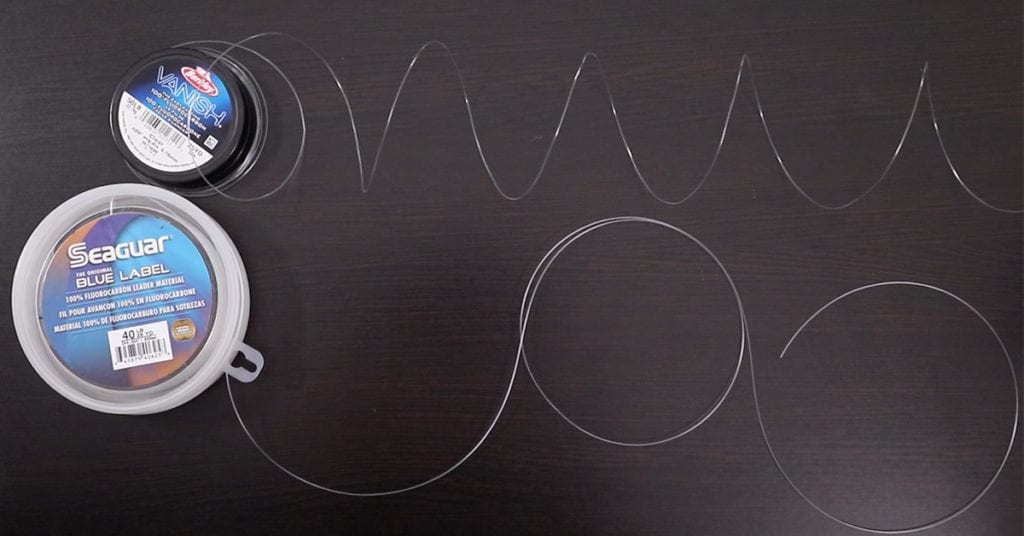
FACT: A fishing leader can make or break you when it comes to landing the biggest fish of the day.
Having a good leader line with strong knots is absolutely essential for inshore anglers who want to land big snook, redfish, trout, tarpon, etc.
However, many inshore anglers simply have never been taught how to make their own leaders, or in many cases, they were taught an inferior way to tie leaders.
I know this because I used inferior knots for my personal leaders for 20+ years… even multiple years of tournament fishing when hard-earned money was on the line.
Many questions have come in relating to tying leaders for snook, redfish, and seatrout in the last couple of months, so I wanted to put focus back onto this article that shows how to tie the best fishing leader for inshore fish that I have found so far after many knot tests.
You’ll, of course, see the overview of why it’s important to use fishing leaders.
And you’ll see the best knots that have proven to outperform the others for the specific connections needed in a proper leader system.
Watch the video below to see what a fishing leader is, and when to use one, and then keep on reading below for everything you need to know about tying the best leaders.
The fishing leader is a short strand of tough fishing line (often stronger and/or less visible than the main line) that is placed in between the main line in the reel and the hook or lure that an angler is using.
There is no maximum or minimum length for leaders, but they are most often in the 1 to 3 ft range… inshore recommendations discussed below.
Why Use A Leader For Saltwater Fishing?
A leader is needed for saltwater fishing because it provides an angler with the ability to keep a big, strong, and often toothy fish from biting through the line near the hook/lure (the “business end”) while allowing the angler to have a much thinner line in the reel for maximizing casting distance and performance.
In this article, we’ll focus the examples to leader assemblies designed to catch big snook, redfish, and seatrout.
What Is Needed To Tie A Fishing Leader?
Fortunately, there is not much equipment that is needed… it mostly involves just knowing how to best put it all together.
Here’s what you’ll need:
Main line in spool (10 lb to 20 lb braid is what we recommend for anglers using spinning tackle)
Note: we highly recommend braid because of its better casting performance and stronger breaking strength related to listed strength as compared to mono
Leader line (20 lb to 40 lb monofilament)
Lure/Hook (whichever lure/hook you plan to use)
Pliers/Scissors/Knife to cut line
[optional] Swivel… if you plan to use a bait that is prone to twisting up your line, then tying a swivel in between your main line and the leader is smart
Want More Inshore Fishing Spots In Your Area?
Then you’ve got to see this private fishing club…
You’ll receive:
Weekly fishing reports and trends revealing where the inshore fish are feeding all year long
Weekly “spot dissection” videos that walk you through all the best spots in certain areas
Exclusive fishing tips from the PROS you can’t find anywhere else
Everything you need to start catching fish more consistently (regardless if you fish out of a boat, kayak, or land).
Many anglers over-complicate their leader lines and some are very intimidated by them… especially when tying line-to-line.
However, the process only consists of 3 steps, and it is quite simple once the knots are learned.
And after a bit of practice, anyone can complete the full assembly quickly even while out on the water in rough seas.
Here are the 3 core steps:
Step 1: Tie Line to Line Knot
The first step in tying a fishing leader is to connect your main line to your leader line…
This is by far the most important aspect of tying a leader line because it will most often be the weakest link in your assembly since the main line is kept light to increase casting performance, while the leader is the heavier of the two lines to withstand the sharp teeth/mouths of many saltwater fish.
For example, even a 50% knot on the hook/lure end of a 30 lb leader is stronger than a 100% knot on a 10 lb main line… (15 lbs vs. 10 lbs).
Here’s some “must-know” line to line knots for those who use braid and/or mono:
Braid to Mono
This FG Knot won our braid to leader knot contest by a considerable margin while also being the thinnest option of them all:
Ready To Finally Fish With Confidence?
Then sign up for our FREE INTERACTIVE Saltwater Fishing School below.
There is no right or wrong length for a fishing leader.
I typically use leaders in the 2 to 4 ft range depending on what type of fishing I’m doing.
For instance, I use a shorter leader when fishing with artificial lures because I do not allow my knots to go through my rod guides because the friction from frequent casts will weaken any knot.
For live bait fishing when the cast count is a fraction of artificial, I’ll increase the length of my leader by 6 to 12 inches.
So I go with a ~24-inch leader for artificials and a 30+ inch leader when live baiting.
Note: Although I start with a minimum 24-inch leader, I’ll, of course, let it get shorter while in use after re-tying due to fish fraying the line or needing to switch lures/baits… I’ll often let it get down to 16 to 20 inches depending on water clarity (clear water = longer leader).
Step 3: Tie Lure or Hook to Leader
The final step is to connect your lure or hook to your leader.
Although maximizing the breaking strength here is not nearly as important compared to the line-to-line knot in step 1, its strength still needs to be considered.
However, some other factors come into play here that shouldn’t be overlooked either… especially when fishing with artificials:
Does the knot maximize lure action?
Will it snag weeds?
The most important aspect of a leader to lure/hook knot is its ability to allow the bait to have as much action as possible… and to address this factor, I highly recommend using a loop knot because the loop does not constrain the lure/hook nearly as much as a typical knot that hugs the eye.
Much lower on the importance list, but still very important is the knot’s ability to avoid snagging floating weeds/debris… because the debris stuck on the knot will significantly decrease the odds of you getting a strike.
If you’re using a leader that is close to the same breaking strength as your main line and your bait doesn’t require much action, then it is smart to use a snug knot because those knots have higher breaking strengths since they generate more friction along the surface area of the hook eye.
See below for the knots that won the respective knot contests:
The Top Weedless Loop Knot
Ready To Finally Fish With Confidence?
Then sign up for our FREE INTERACTIVE Saltwater Fishing School below.
When fishing with lures like spoons that are prone to cause twists in my line, it is good to tie a swivel in between the main line and the fishing leader line.
This will help decrease the line twists in your line, which will help decrease the odds of getting frustrating wind knots.
Just like before, the most important knot in this setup is the one that connects your main line to the swivel…
Since the FG knot is only for connecting a braided line to a mono leader, a different braid knot is needed.
Braid To Swivel Knot
Ready To Finally Fish With Confidence?
Then sign up for our FREE INTERACTIVE Saltwater Fishing School below.
Note: This modified uni knot for braid won our braid to swivel knot contestwe held to evaluate this important connection.
Once this modified uni knot is tied, then use the Orvis knot shown above to connect the swivel to the leader.
If using a mono main line, I like tying the Orvis knot to connect to both sides of the swivel… it’s very simple to tie and has a very impressive hold strength. However, the very popular Palomar knot and the Uni knot are both excellent choices as well… they all 3 scored extremely close in our knot strength analysis.
What Size Leader Line Should I Use?
There is no one-size-fits-all fishing leader line size for any species… it all depends on water clarity, size of expected fish, amount of structure nearby, etc.
But here are the strength range that I most often recommend:
Redfish, trout, and flounder on the flats: 20 lb to 25 lb mono leader and 10 lb braid main line is my favorite
Snook on the flats: 25lb to 30 lb mono leader and 10 lb braid main line
Snook and redfish in inlets and/or near structure: 40 lb to 60 lb mono leader and 20 lb to 30 lb braid main line depending on size of expected fish
Tarpon/Cobia on the flats or near inlets: 50 lb to 80 lb mono leader and 20 lb to 40 lb braid/mono main line depending on size of expected fish
Although the 10 lb braid main line seems a bit light for battling big snook and reds on the flats, just keep in mind that the true breaking strength of braid is often much higher than its listed value.
For example, I consistently get a 20 lb to 22 lb line system when using an FG knot to connect my “10 lb” PowerPro braid to a 30 lb fluorocarbon leader… and this 20 lb level is higher than the max drag setting on most inshore spinning reels.
In case you’d like to see the light gear in heavy action… here’s a short video of a decent-sized tarpon getting landed on my inshore setup:
Ready To Finally Fish With Confidence?
Then sign up for our FREE INTERACTIVE Saltwater Fishing School below.
The 2 core upsides to using lighter main lines are that they:
Significantly increase casting performance (over 20% longer casts as shown in this casting experiment)
Decrease wind/water drag which makes for an improved feel of strikes and a better retrieve while working lures
And these upsides completely overshadow the downside of the line not being quite as strong as it otherwise could have been in my opinion.
What Type of Leader Line Should I Use?
There are a few types of lines that are popular for leaders that all anglers should knot about… here’s a list:
Traditional Monofilament – The economic option that’s better than what most anglers think
Fluorocarbon – Fairly new type of Monofilament that is known for being less visible than regular mono based a lower refraction of light going through it
Wire – Used when targeting toothy critters like sharks, mackerel, barracuda, etc.
There has been a lot of heavy marketing on behalf of fluorocarbon over the past 10 years that has make it very popular even though it costs significantly more than traditional monofilament.
I used to use it exclusively until the past 12-months when I began doing line tests between the two and found that the results for fluorocarbon have not justified the price difference… it actually has underperformed regular mono in abrasion experiments on a consistent basis. I’ll be doing some tests on the visibility factor soon.
There is an endless amount of options for lines these days, so it’s tough to sort through the good vs. the bad.
For those of us who use spinning tackle, it is very helpful to use braid line vs. monofilament because the much thinner braid will significantly increase your casting distance (see braid vs. mono casting distance test here).
And the zero-stretch nature of braid will enable you to feel strikes and set hooks so much better which will undoubtedly result in more fish caught just by making this one simple adjustment.
Here are the strengths that I most often recommend based on fishing type:
Redfish, seatrout, snook, and flounder on the flats: 10 lb to 15 lb braid main line is my favorite
Big Snook and redfish in inlets and/or near structure: 20 lb to 30 lb braid depending on size of expected fish and the amount of current and structure that is typically present
Tarpon/Cobia on the flats or near inlets: 20 lb to 40 lb braid/mono main line depending on size of expected fish
Conclusion
When fishing for most saltwater species, it’s important to use a fishing leader to increase the odds of landing the biggest fish of the day while also having the ability to effectively cast and present your bait for increased strikes.
And fortunately for you, tying a strong leader doesn’t require a lot of fancy equipment.
It simply involves having two different types of line and knowing 2 to 3 different knots.
Play around with the knots to find out which ones give you the best hookup ratios for the type of lines you use.
Any questions on how to tie a leader?
Just let me know in the Comments section below.
And if you know someone who wants to learn more about how to catch spooky fish, please TAG or SHARE this with them!
In particular, it’s time to see just how well you know the snook in this one of a kind “Snook Quiz!”
After all of the feedback we had from the viral “Redfish Quiz” (you can the redfish quiz here), we heard from many of you asking for another fun fishing quiz… so it made sense to follow it up with one of our favorite saltwater inshore fish, the snook.
Now if you are anything like me, you love catching Snook.
In fact, if I had to pick just one fish in Florida to catch for the rest of my life it would probably be the snook.
Here a just a few reasons that snook have become one of the most popular game fish in Florida (and in South America):
Snook are incredible fighters
Snook are plentiful (unless we have another deep freeze in Florida again…)
Snook get pretty freakin’ big and fat
Snook never get old to catch
And in many cases, you don’t even need a boat to catch snook
But as you will find out below in this snook quiz, it’s one thing to be able to catch a snook, but it’s an entirely different ballgame to answer 10 questions in a row correct about our beloved snook…
Just a warning, this quiz isn’t easy!
Take the Snook Quiz below now and let us know your score in the comments!
Related Post: “5 Shortcuts To Catching Snook In Florida” (see it here now)
P.S. – If you think your angler friends or fishing networks would like to see this, please Tag them or Share this with them. You Rock! Pa-POW!
Fish On.
Want to let the world know that you are Snook Strong?
Then click the image below to see the top-selling “Snook Strong” Performance Fishing shirt. POW!
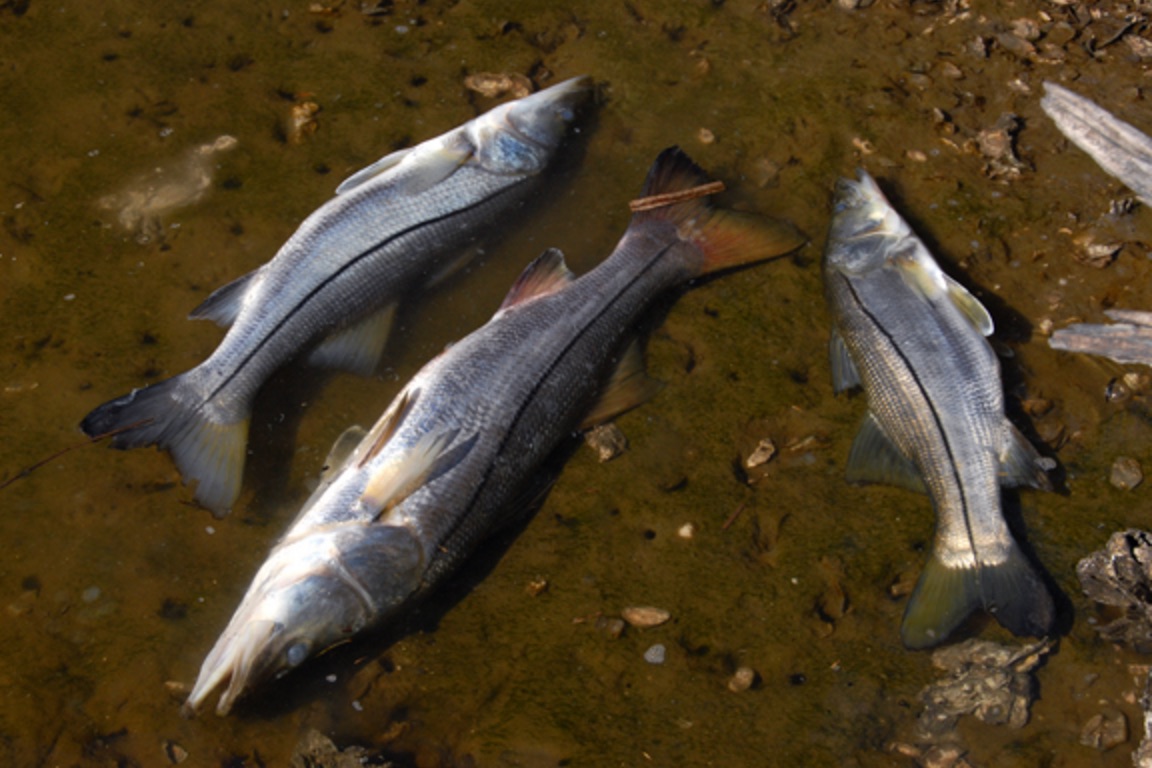
27,000 Dead Snook.
27,000!!!
That is the estimated number of snook that die ever year here in Florida due to mishandling of the snook in between the catch and release.
Let me repeat that.
This number represents the amount of snook that die AFTER the release.
These 27,000 dead snook are NOT the amount of snook that were legally killed to feed our families.
Yep, this scary number above represents the amount of snook that die every year due to careless mishandling of snook by anglers like you and me after we thought they were “safely released”.
Turns out, a decent percentage of snook that we all think swim away just fine never make it much longer.
Fisheries and wildlife groups like the FWC (Florida Fish & Wildlife Conservation Commission) refer to these “catch and release” fishing deaths as “Cryptic Mortality”.
And in this blog, we will cover the top 3 mistakes that anglers are making when releasing snook (and how to fix them).
What Is Snook Cryptic Mortality?
Cryptic Mortality is defined as a fish dying after being caught and released due to mishandling, abuse, or some other type of physical injury caused during a catch and release.
According to the FWC, the current catch and release cryptic mortality rate for snook is at 2.13%.
Now that might sound pretty low to you, but when you consider that anglers in Florida caught and released an estimated 1.3 million snook last year, that equates to an estimated conservative 27,000 snook that died due to cryptic mortality.
What a sad stat for all of us that love snook so much.
The good news is that this alarming number of unnecessary snook dying after release can be lowered if we all handle snook the proper way as outlined below.
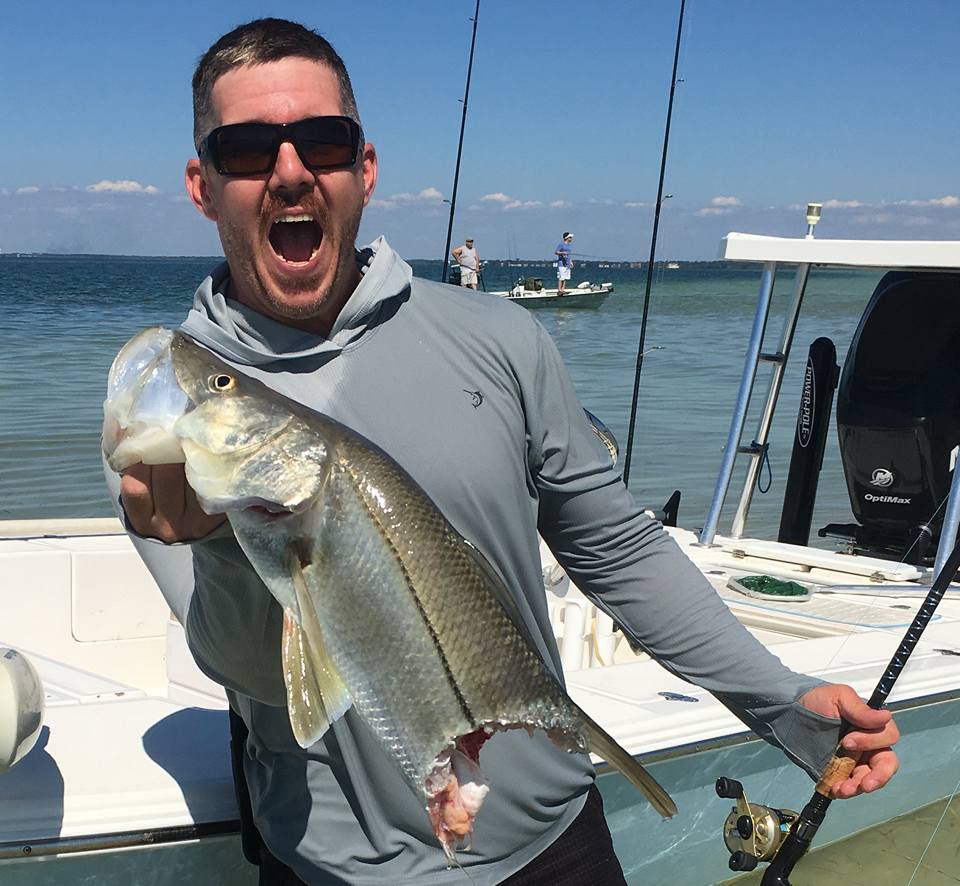
Unfortunately, there will always be snook that die after being released due to swallowing hooks (which is frequently caused by them swallowing lures with treble hooks), being eaten by Goliath Grouper immediately upon release, and other snook deaths that are sometimes out of our hands.
Angler Kyle Rider and his buddy Woody Williams with a half-eaten snook that lost a battle to a bull shark right next to them while they were wading. Just more proof that sharks love to eat snook (especially weak and worn out snook)
But when released correctly, a snook not only stands a great chance of not only surviving, but thriving, mating, and getting bigger.
And if all of the snook anglers in Florida avoid these three mistakes below, the estimated 2.13% cryptic mortality rate could get much closer to zero.
Let’s go over the three top mistakes that anglers are making when releasing snook.
Note: These catch and release mistakes can apply to lots of different fish (not just snook)
The Top 3 Mistakes Anglers Make When Releasing Snook.
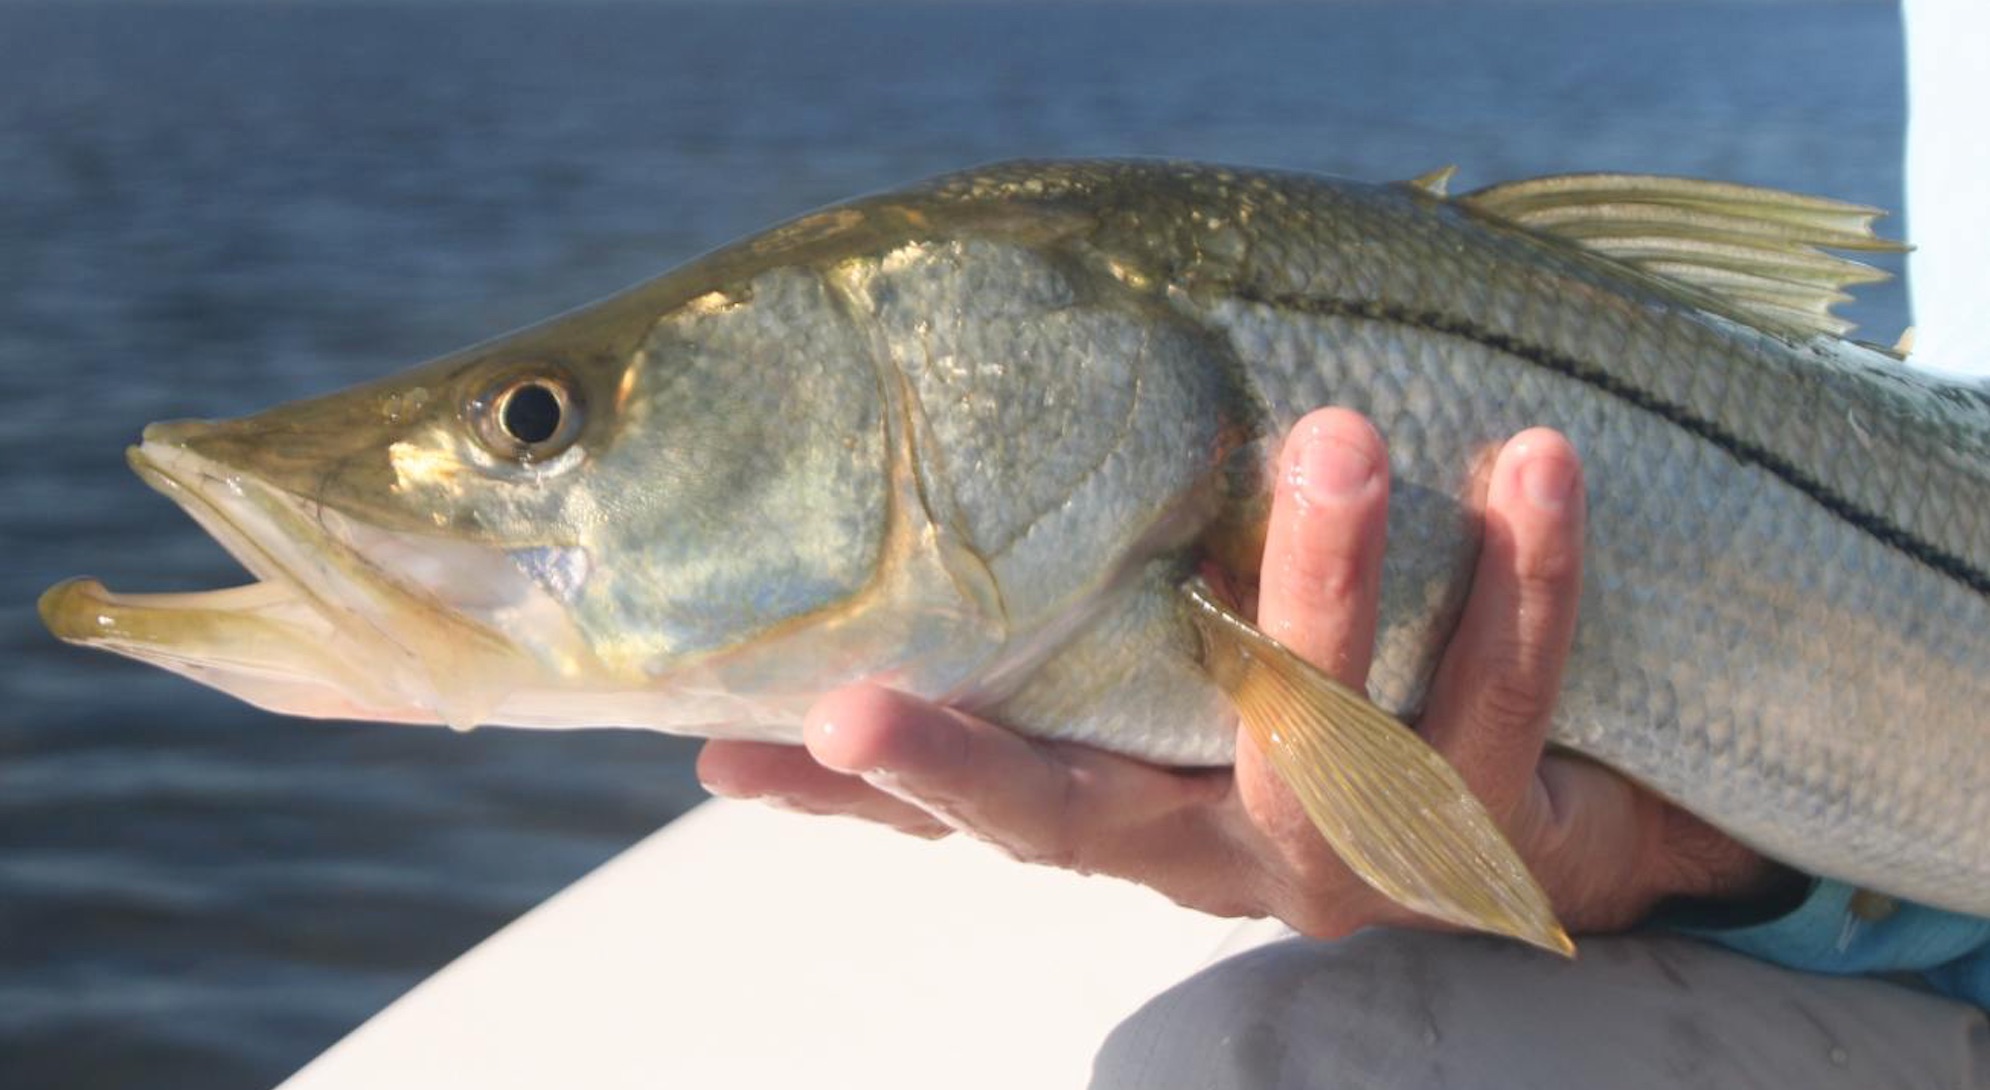
Mistake #1 – Breaking A Snook’s Jaw
An angler holds a snook by the lip with the full force of the snook’s body being supported by the jaw
Imagine if you broke your entire jaw today…
Do you think it would be tough for you to eat tomorrow?
Do you imagine that you might lose a bit of weight and be on more of a liquid diet while your jaw healed enough where you could open your mouth fully, chew regularly, and eat like normal?
Of course.
And that is exactly what happens when a snook has its jaw broken by an angler holding it up by the jaw with no support anywhere else.
But with one slight difference… a snook CANNOT go to a doctor or get on a liquid diet while it waits for its jaw to heal like a human can!
If a snook gets released back into the water with a broken jaw, here is what happens:
It can’t eat like it normally would
It quickly loses strength just like a human would if we didn’t eat
It dies from either starvation or from being easily hunted down by a shark, porpoise, goliath grouper, etc.
Not to mention, if a really large snook is held vertical by its lower jaw with zero support, not only are the chances high that you break his jaw, but you also run a really high risk of shifting their organs or separating their invertebrate (both of which usually result in death after release).
If you haven’t heard about the Australian Barramundi study (the Barramundi is a fish in Australia related to the snook and very similar in body makeup and size), here is what happened when they vertically held up 50 Barramundi by the lower lip and released them:
In this study, Aussies researchers captured 50 Barramundi with a net, held them vertically by the lower lip (the same place most of us grip a snook) long enough to weigh and measure them, and then placed them in a large holding pen to see how they did.
Within 48 hours, every single one of them had died. That’s right, all 50 Barramundi died! Immediately after death, their carcasses were taken to a hospital and x-rayed, where the films revealed that many vertebrae had separated by as much as 2 millimeters and that the internal connective tissue was damaged all due to the vertical lip hold.
Moral of the story… don’t hold snook by the jaw without supporting the rest of the snook’s body!
If you hold a large snook vertically by the jaw long enough, there is a very good chance you will either break its jaw, rupture its insides, or both.
However, there are two exceptions to this rule…
Two Exceptions To The “Broken Snook Jaw” Rule:
Strong Angler CJ with a juvenile snook
Snook Exception #1
The first exception to the “broken jaw” rule is the juvenile snook.
An incredibly small snook (under 20 inches) is not as susceptible to a broken jaw if held vertically due to the fact it doesn’t have as much weight to break the jaw.
However, even a small snook can suffer a broken or dislocated jaw (just as a baby human is less likely to break a bone than a grown adult, but it certainly can happen).
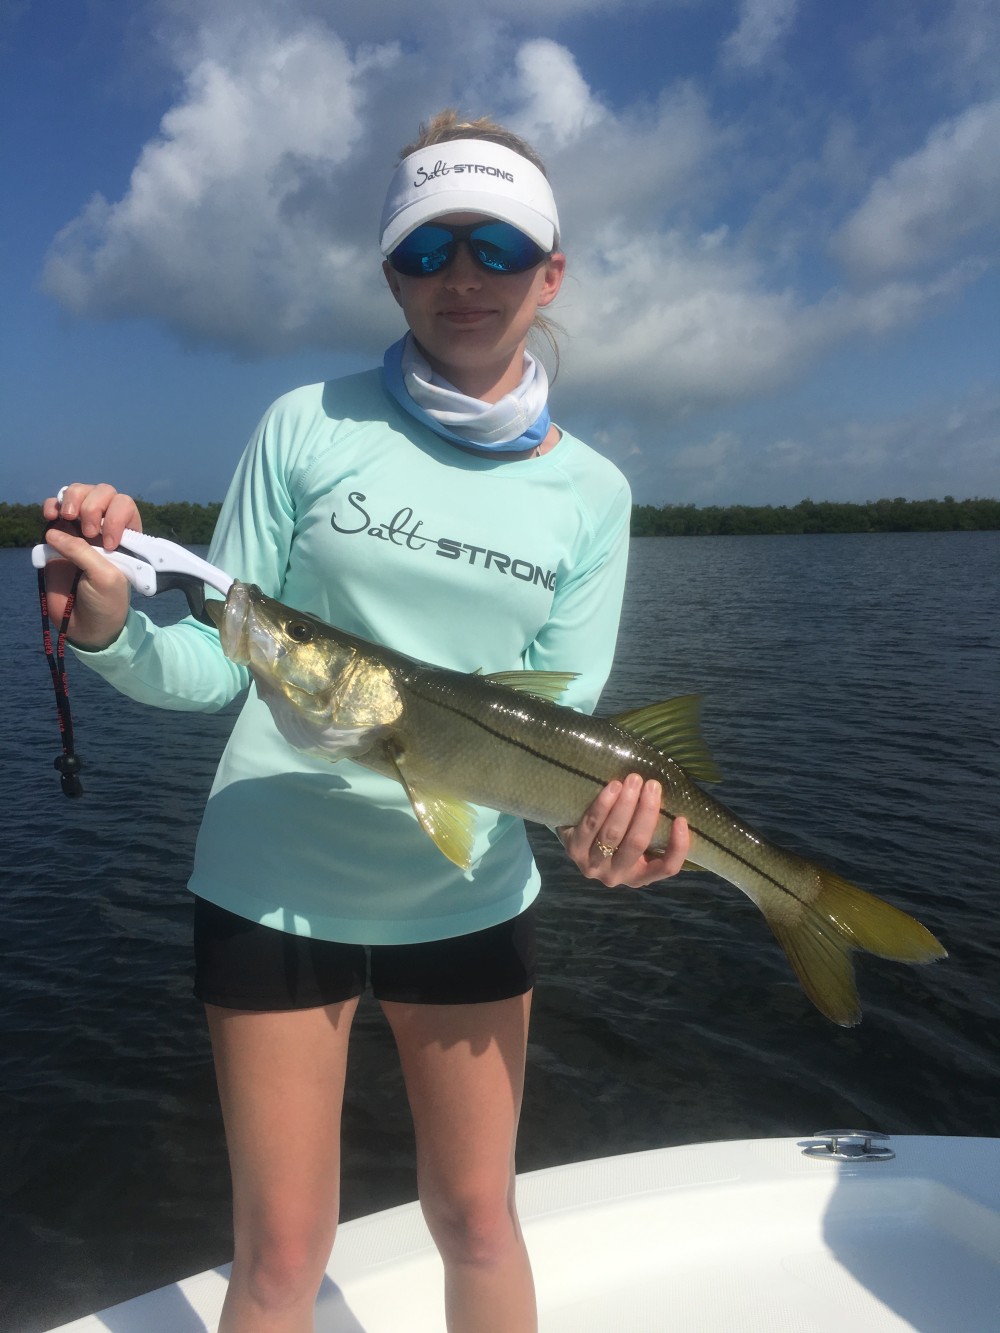
The best advice is to ALWAYS practice holding a snook properly (with one hand under the belly or tail for support) because it is a good habit to get in. And there is no written rule on what size snook constitutes being too small to worry about breaking his jaw or disrupting his stomach.
Strong Angler Andrew Poupard with a slot snook
Snook Exception #2
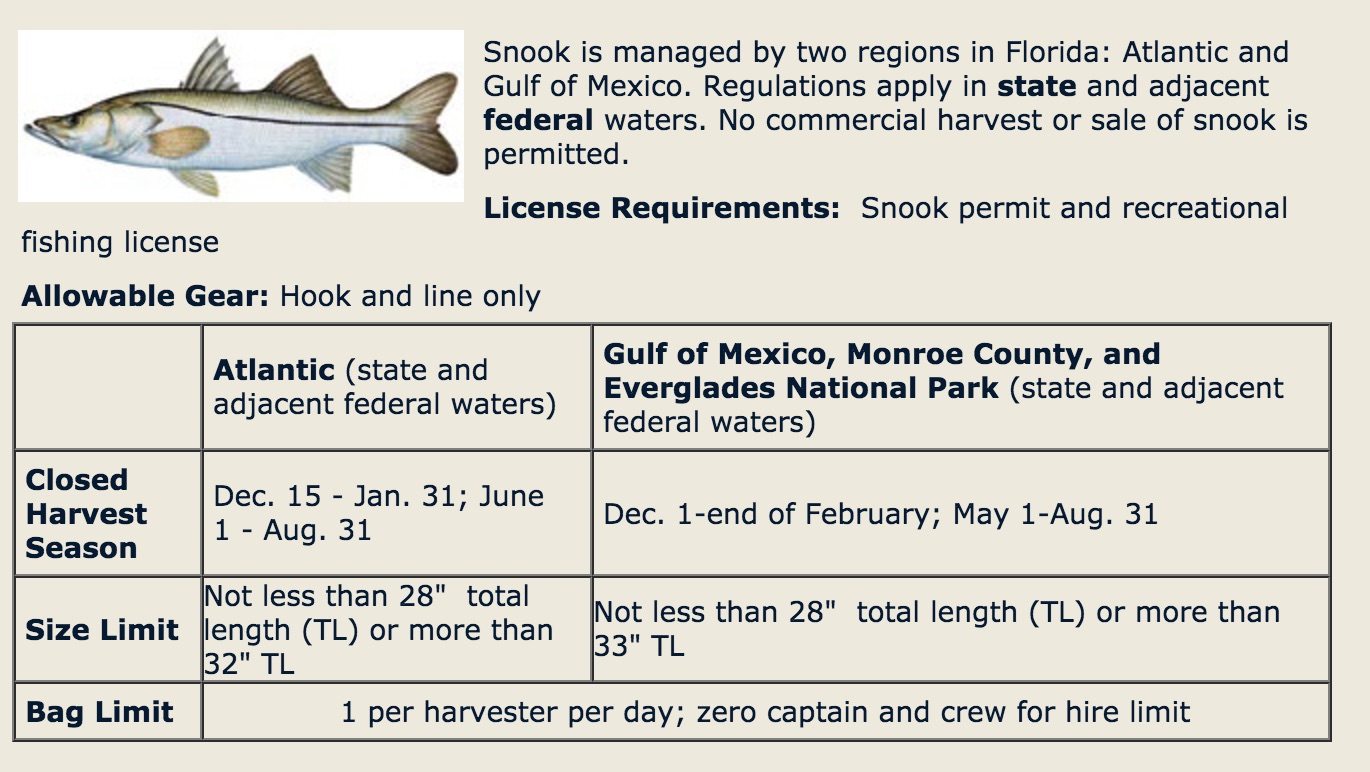
The second exception to worrying about killing a snook by an incorrect hold is when you are 100% sure it is a slot snook AND that you are keeping to clean and eat (in Florida, the current keeper size slot snook is 28 to 32 inches on the Atlantic and 28 to 33 inches on the Gulf).
Please see the FWC website for snook updates, open season dates on each coast, etc.
If you have a slot snook that you are about to put in the live well to take home for dinner, a broken jaw or ruptured stomach isn’t going to change things (since the snook is going be on someone’s table in the near future).
However, just like when dealing with juvenile snook, it is always best to get in a good habit of holding a snook the proper way (held horizontally with full support of the stomach).
Some important notes:
Don’t ever use a gaff (even a lip gaff) when landing a snook
Don’t try to be the “Fish Police” on social media by calling every single snook picture you see that has a vertically held snook. I have seen way too many cases when the snook was a slot fish and was being kept for dinner when some keyboard lawyer started posted negative comments about the pic.
Here are the current open season rules in Florida from the FWC website as of Dec 7, 2016:
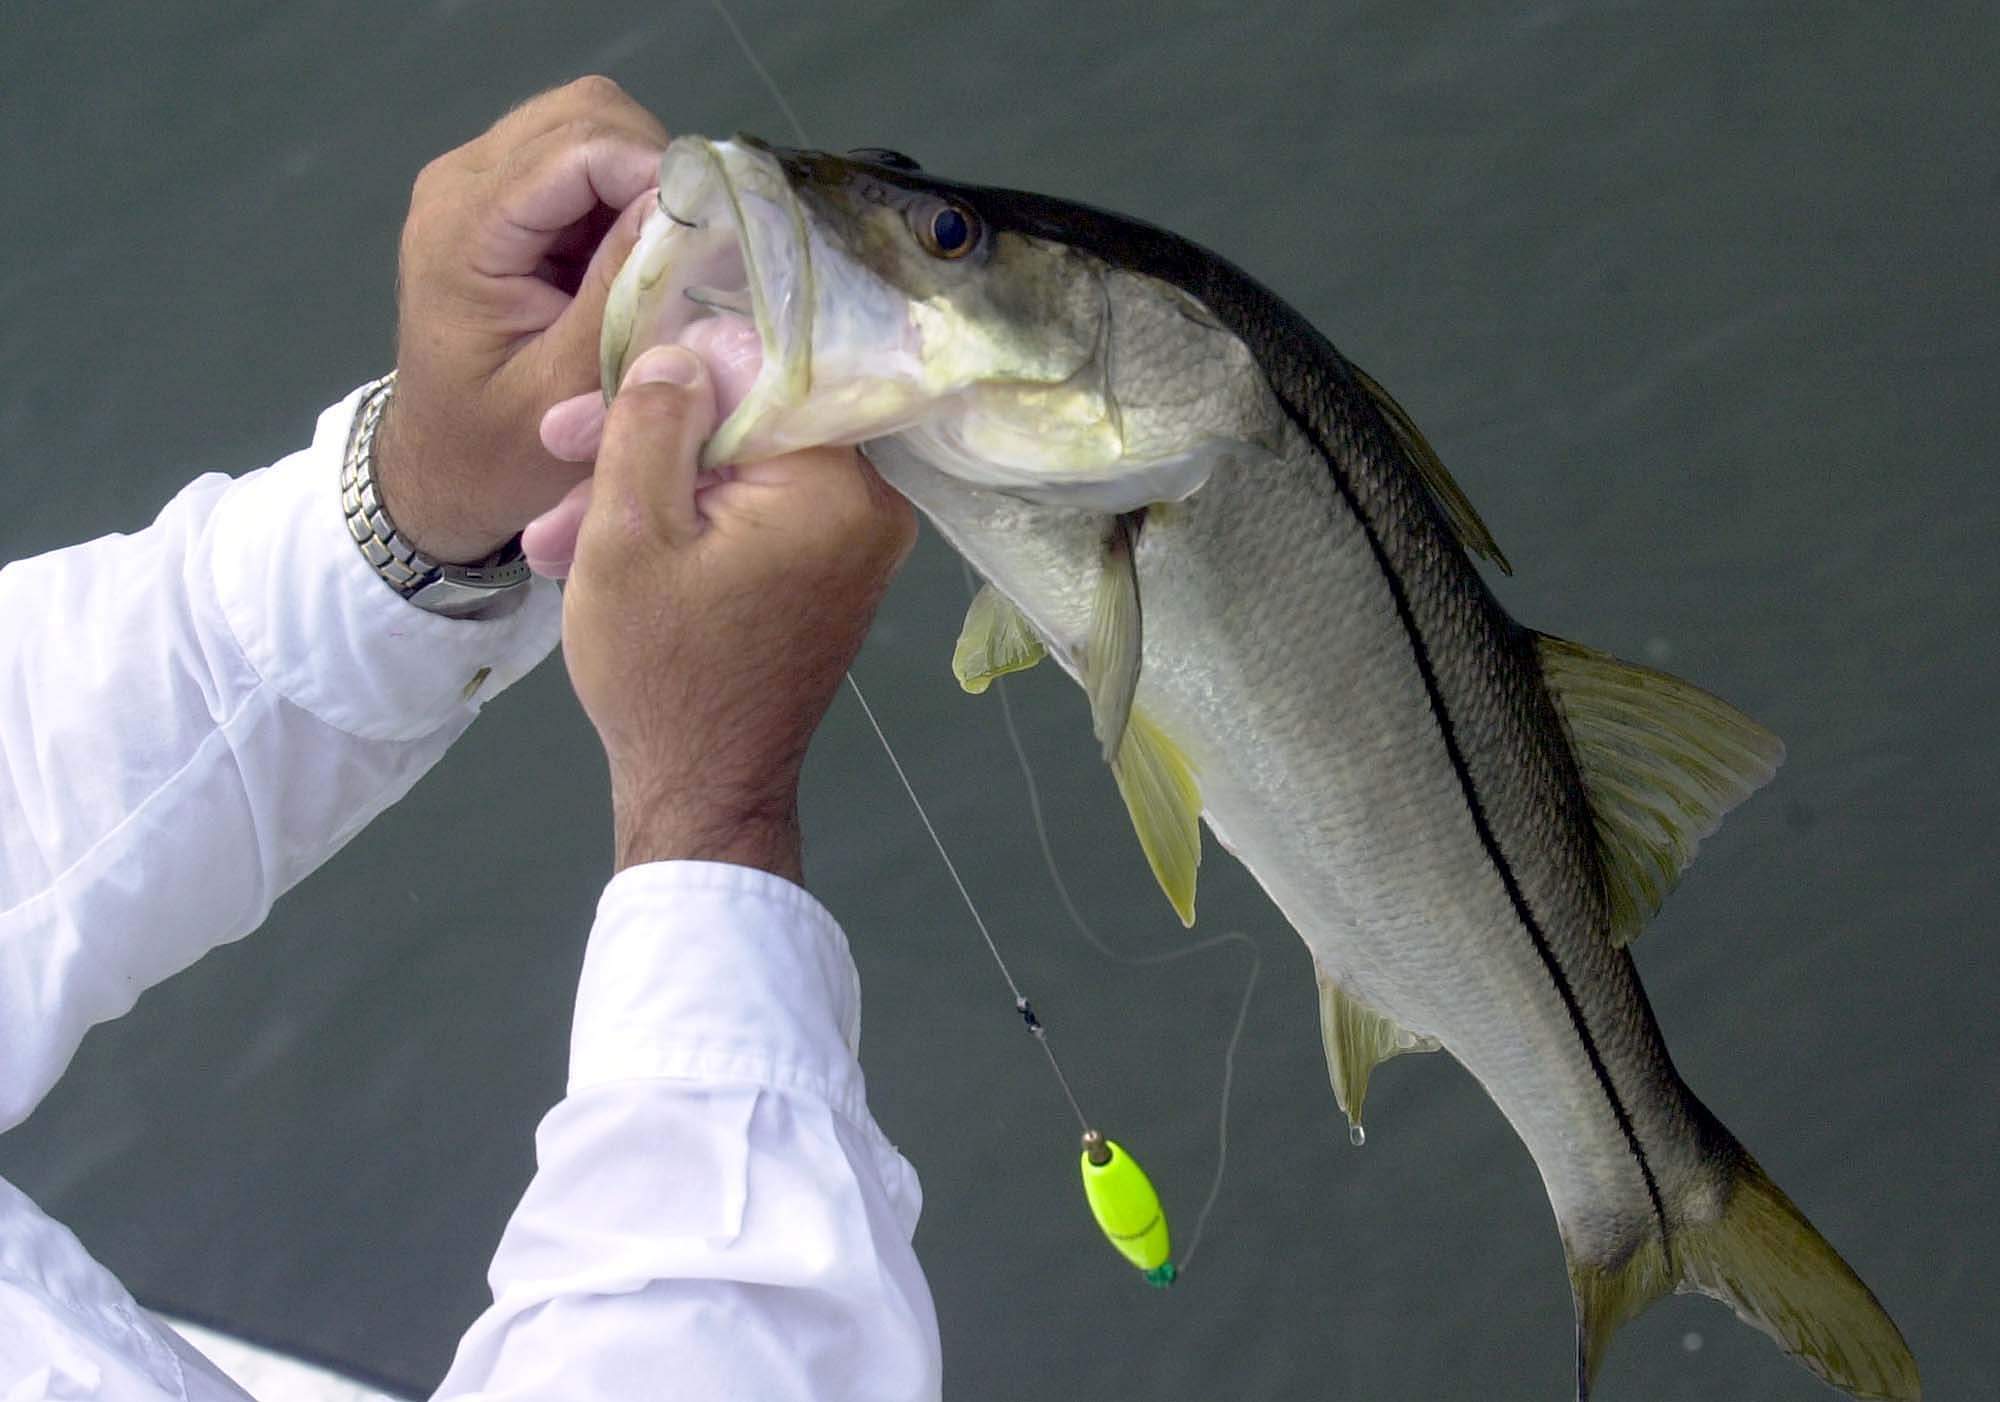
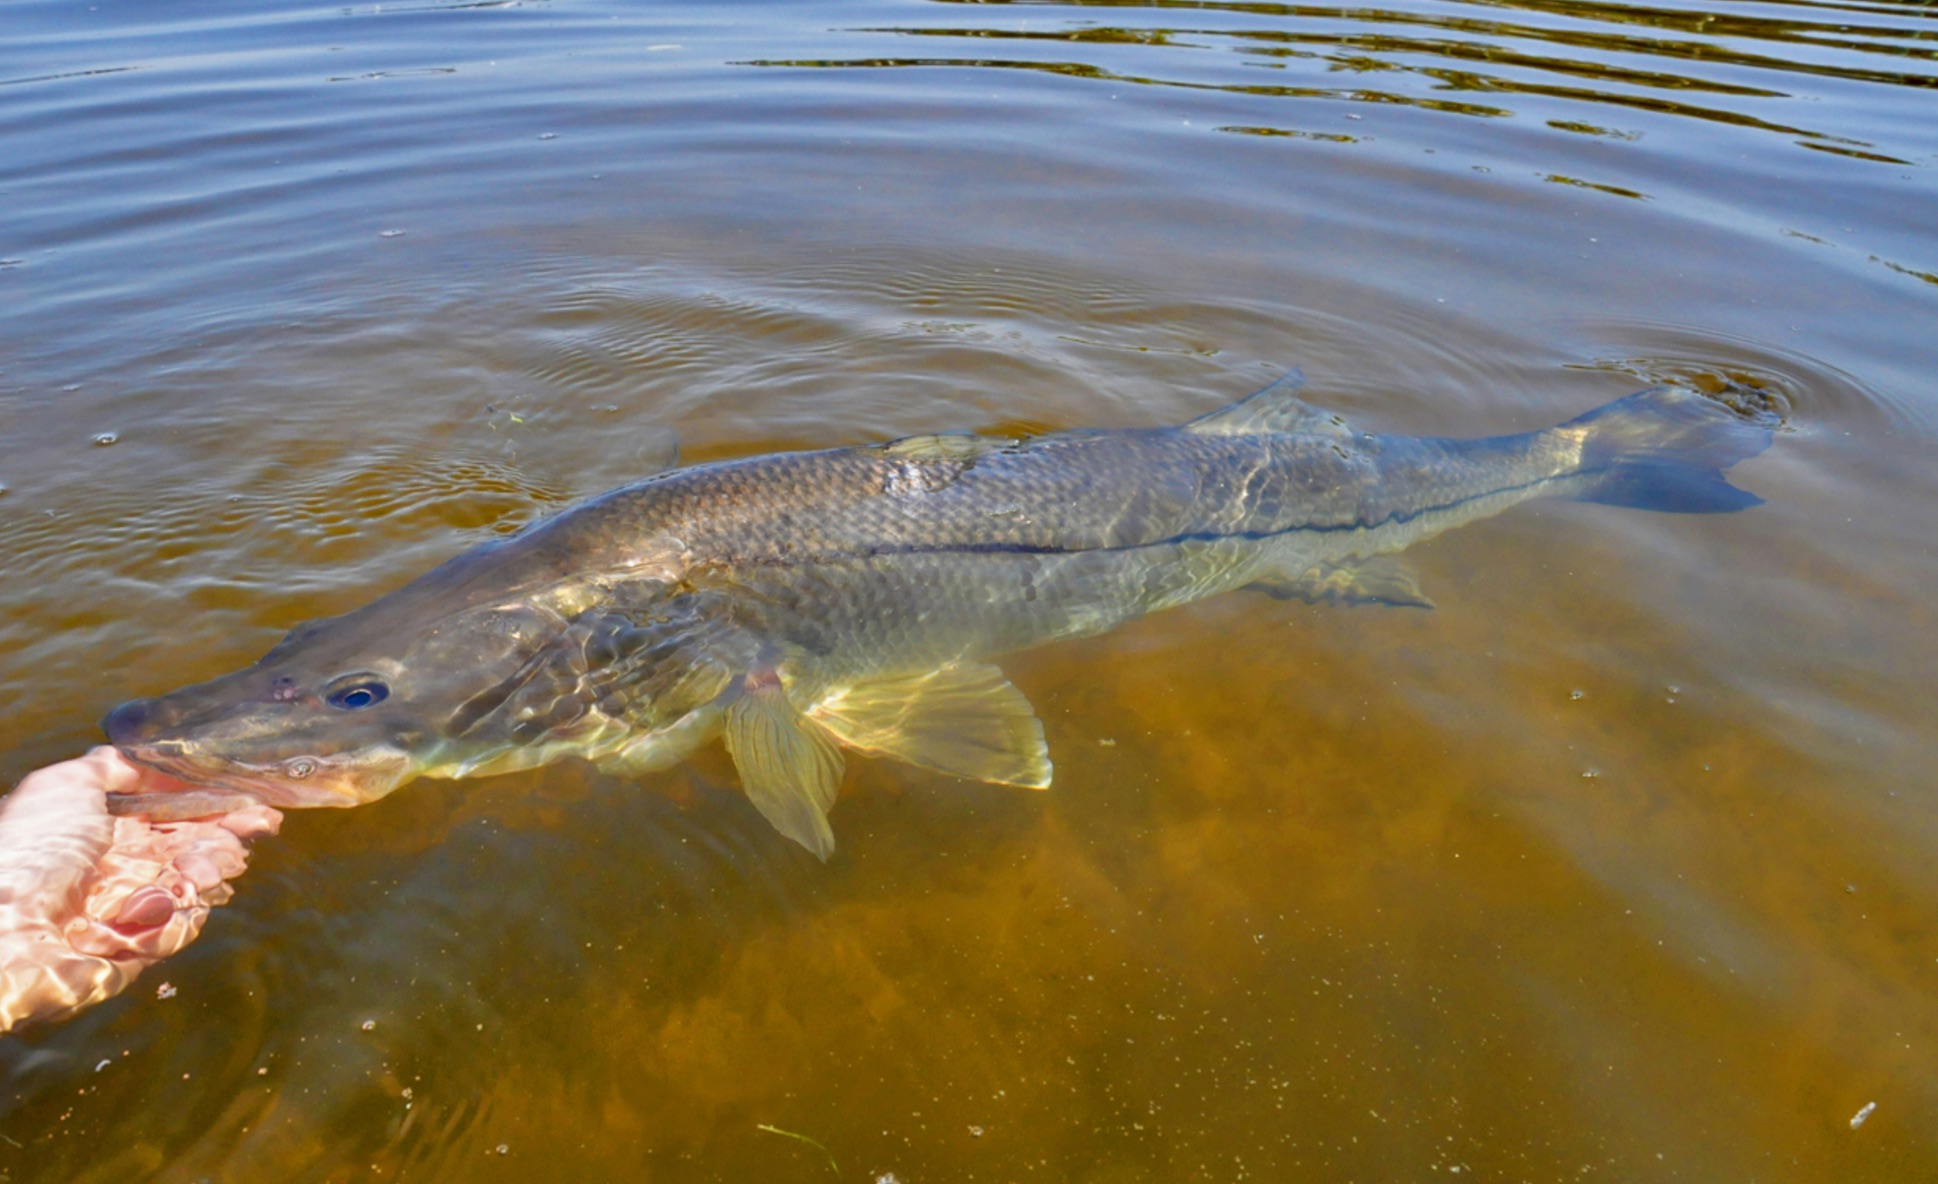
So how do you properly hold a snook?
If you surf around social media and look at snook pics, you will hear all kinds of different comments on how to hold them.
The bottom line is that a snook’s body (including their organs, vertebrae, etc) was built to be underwater. And even though snook have very strong lips and jaws, it doesn’t mean they can’t easily suffer a broken jaw when held solely by the lower lip in our gravity-filled environment.
However, snook can certainly withstand being out of the water for short periods of time if they are held correctly. You essentially want to replicate how their body would rest while under water by doing the following:
Use one had to hold the snook’s bottom lip to make sure it doesn’t leap out of your hands
Use your other hand to fully support the bottom of the snook’s belly or underside.
Here are a few examples of properly held snook for pictures.
or this one…
and this one…
Notice the holding of the bottom lip AND a wet hand fully supporting the stomach/bottom of the snook
The irony is that a snook held horizontally with full body support will usually not jerk, jump, or thrash like a snook held vertically will.
Makes it much easier for a picture, measurement, etc.
Mistake #2 – Rapid Back & Forth Revival
The second mistake anglers make is much less “deathly” than the broken jaw, but it still can cause issues that result in death when reviving the snook next to the boat, dock, pier, etc.
And to be quite honest with you, I was guilty of doing this before I read an article a few years ago about the proper way to release and revive a snook.
The point of the article was that you must revive a snook naturally in order to give it the best chance of regaining strength before heading back in the wild and trying to fend off a hungry shark, goliath, or porpoise nearby.
What does a “Natural Revival” for a snook look like?
First, let me tell you what it doesn’t look like…
Have you ever seen a snook under a dock or on a grass flat moving back and forth like an out of control remote control car going back and forth as fast as it can?
Of course not!
When snook are recovering or getting their energy ready for an attack on a bait fish, they are barely moving (and they are certainly not moving backward and forwards rapidly).
So why is it that some of us anglers feel we must move the snook back and forth in the water as fast as we can to help it revive when we know snook never do that in their natural habitat?
Since I was guilty as of this as well, I assumed that by moving a snook back and forth under water would help increase water flow through it’s gills.
Turns out I was wrong…
Back and forth is NOT a natural motion for the fish, and if all you do is grab the snook’s lip, move it back and forth a few times, and then let it swim off, you could be hurting the snook’s chances of survival.
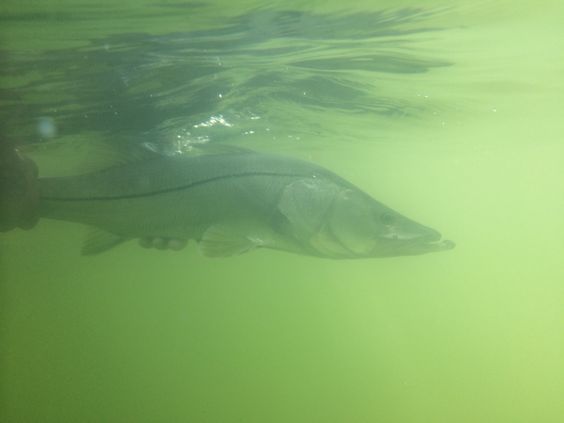
The best thing to do during a snook release/revival is the following:
Get the snook back in the water as quickly as you can after you have removed the hook, taken pics, measurements, etc.
Position the snook’s head into the current (if possible)
Hold the snook underwater in a horizontal, steady position (do NOT move the snook back and forth), and use your fingers (or fish holding device) to hold onto the snook’s bottom lip and wait for it to get some energy back before letting it go. Usually, a snook will actually “suck your thumb” and won’t let go until it is actually energized and ready to go. You can also hold the snook from the tail and the belly like the picture below.
Captain Benny Blanco releasing an Everglades Snook…
Notes: The longer the fight, and the longer the snook is held out of the water, the longer the revival needs to be. NEVER just toss them back in the water.
Mistake #3 – Dry Hands
Notice the wet hands supporting the belly of the snook
Did you know that the light layer of slime on the body of a snook is essential for the fish to fight parasites and to remain healthy?
And if this slime is rubbed off by human hands, it doesn’t just grow back overnight.
In fact, it could weaken the snook’s immunity to parasites that slowly kill the snook without their slimy coat of protection.
Usually, the loss of a snook’s slime layer is caused by an angler holding or touching the snook with a dry hand.
So how do you avoid hurting a snook due to dry hands?
It’s best to follow these simple steps when catching and releasing snook:
Use a jaw-clip device or Boga Grip to “lip” the snook with one hand
Moisten the other hand in the water while your other hand hold the snook in place with the fish grip
Cradle the fish’s belly in a horizontal manner.
Remove the hook from the snook’s mouth (or cut the line if the snook swallowed the bait)
Snap the photo quickly
Release and Revive
The lesson: Even if you don’t have a pair of fish grips handy, always wet your hand(s) before handling a snook (or any saltwater fishing for that matter).
Conclusion
Strong Angler Kayla Phillips with a nicely supported snook and lip grip
Even though the estimated 2.13% cryptic mortality rate (the percentage of snook that get caught and released which end up dying due to the trauma from the release) might seem low, it equates to tens of thousands of snook that die because of us.
These dead snook will never be caught again, they won’t be able to reproduce, and they won’t be able to help grow the snook population that we love so much.
So please make sure to start practicing all three of these snook handling tips going forward. And don’t just use them on non-slot snook, get in the habit of perfecting your snook catch and release so that we can all work together as anglers to get that death percentage as close as we can to zero.
To reiterate the three mistakes most anglers make:
Don’t break their jaw (or back) by holding them vertically
Don’t do a rapid back and forth revival underwater
Don’t ever grab a snook with dry hands
Hope you got something out of this snook blog.
Do you have any other great tips on catching and releasing snook?
 See the Insider Report from this trip