
The Non-Slip Loop Knot
The Non-Slip Loop Knot is a MUST KNOW knot for fishermen who use artificial lures.
This is my favorite loop knot for connecting to lures because it:

- Is very fast and easy to tie
- Has a strong breaking strength
- Leaves a weedless tag end
In general, loop knots are extremely valuable to fishermen who use artificial lures because a good loop knot will help generate more strikes since it enables the lures to have more action in the water.
In this article, we show you the step-by-step instructions with pictures on how to tie the Non-Slip Loop Knot.
Plus, you can see a detailed video at the bottom of this article that shows it all done very close up with actual fishing line so that you can see all of the steps in action.
➡ CLICK HERE to get a FREE PDF guide showing all of these essential steps on tying this knot so that you can have a printout whenever you need it.
Step-By-Step Instructions
Here are the core steps for tying the non-slip loop knot. This loop knot can be used for any type of mono/fluoro fishing line.
Note: We are using a fluorocarbon leader line in the tutorials below, and we connecting it to a topwater plug in this application.
➡ CLICK HERE to get a FREE PDF guide showing all of these essential steps on tying this knot so that you can have a printout whenever you need it.
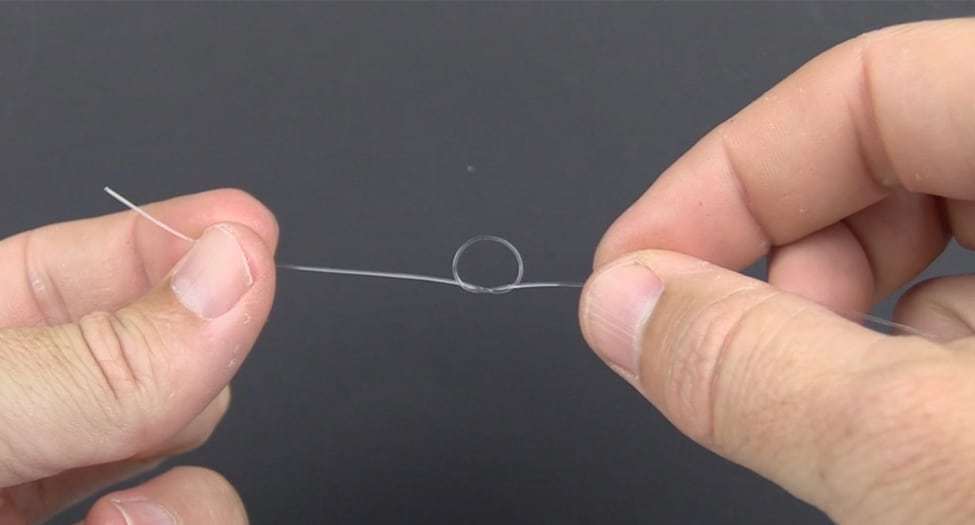
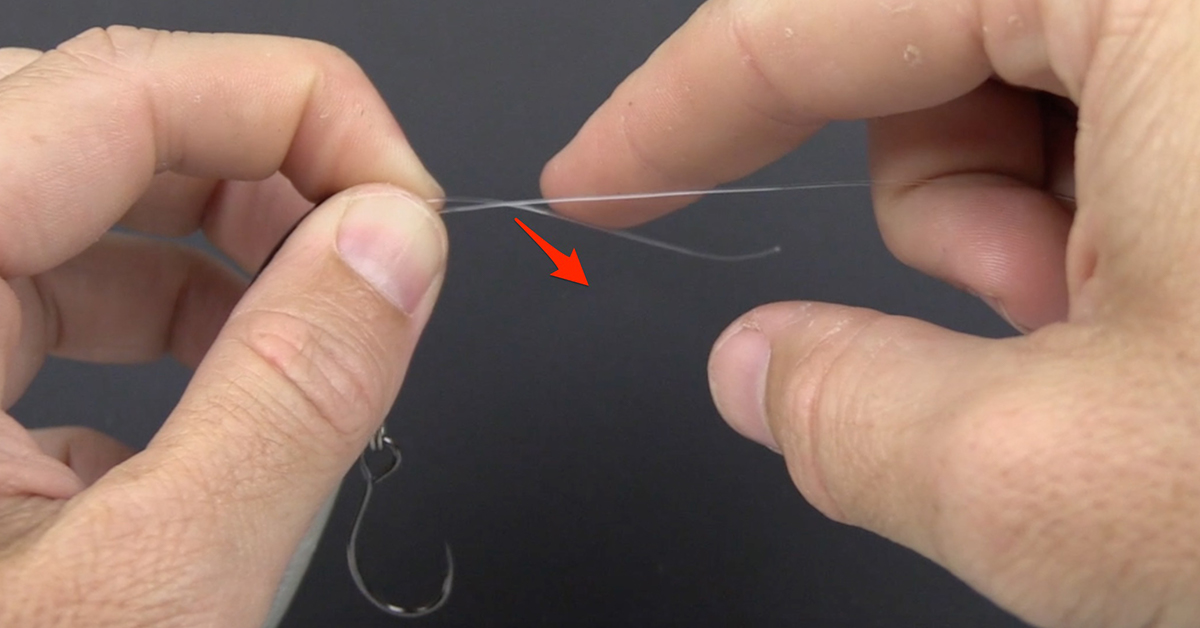
Step 1: Make an Overhand Loop
Make an overhand loop about three to four inches up from the tag end of your line. Make sure the top side of your overhand loop is pointing up toward the main line.
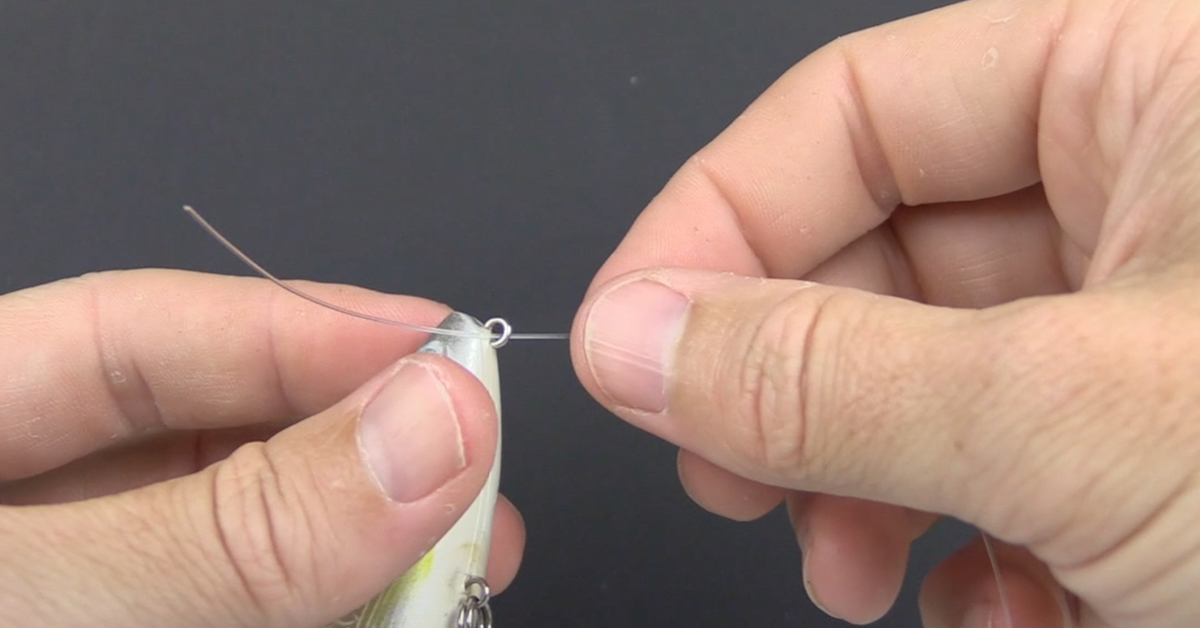
Step 2: Pull the Tag End of Line Through the Eye of the Lure
Pull the tag end of your leader line through the eye of your lure.
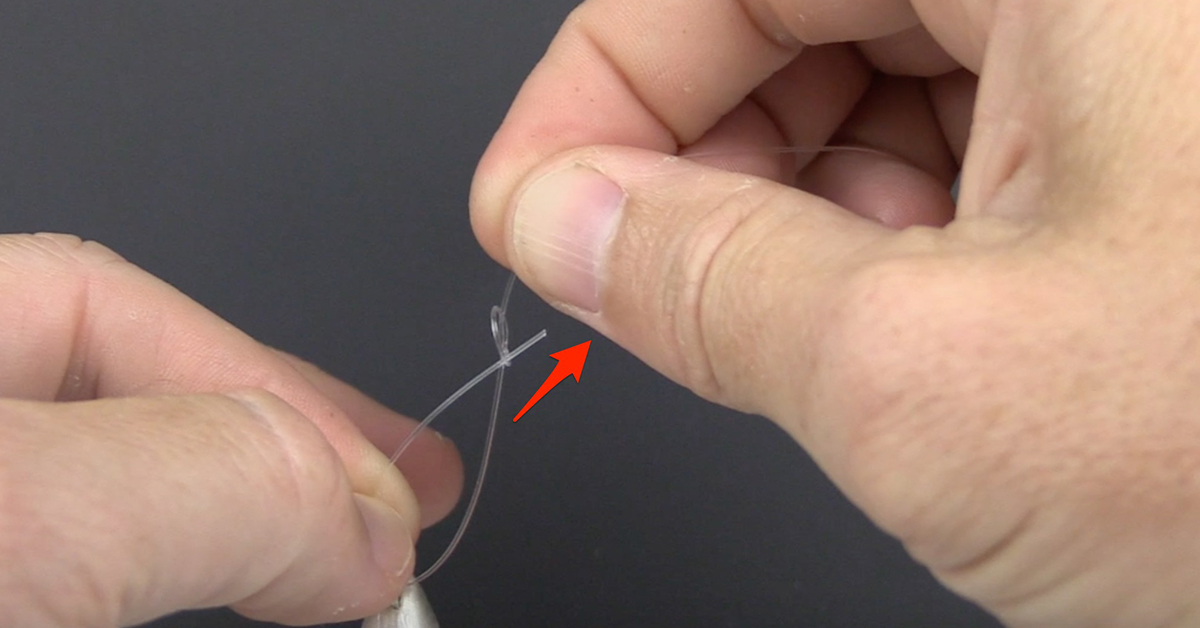
Step 3: Pull Your Tag End Through the Downward Side of Your Overhand Loop
Pull your tag end through the downward facing side of the overhand loop you made in Step 1. Pull both the tag end and main line until your overhand loop slides down to the hook eye. Pinch the overhand loop with your thumb and index finger.
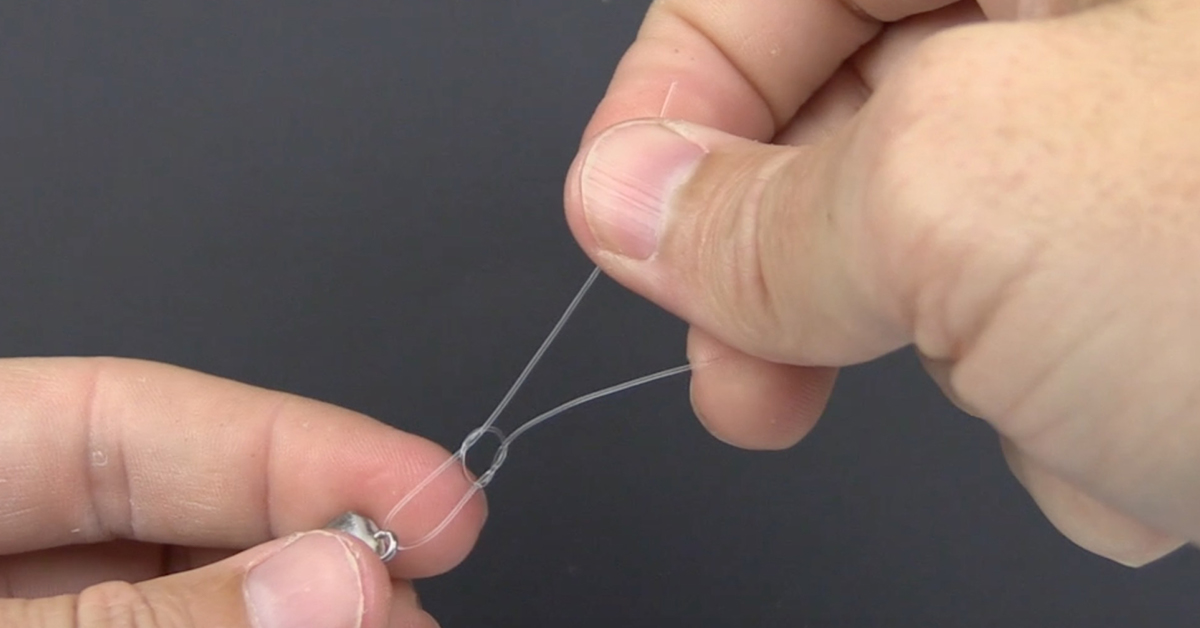

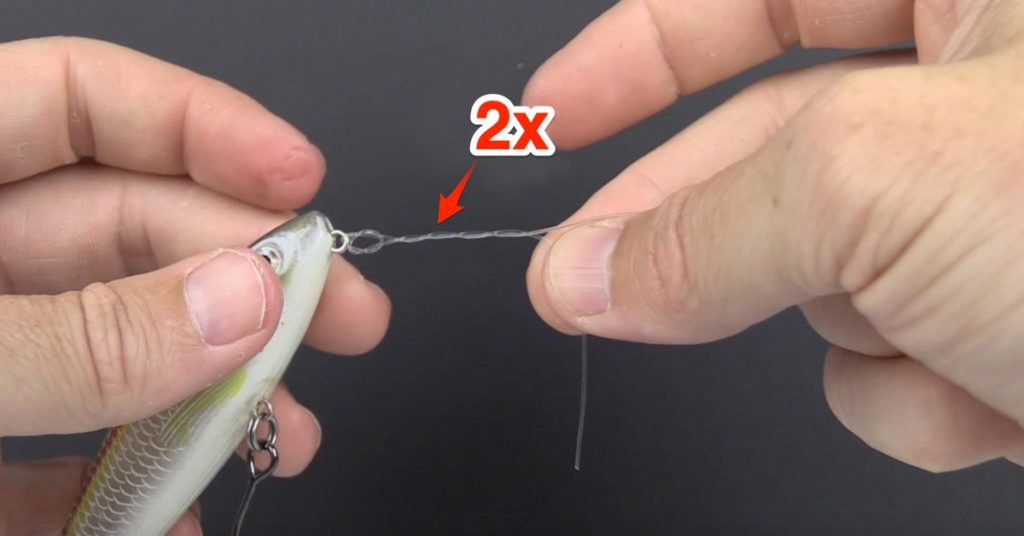
Step 4: Make 2 Wraps With the Tag End Around the Main Line
Use the tag end to make two wraps up the main line. Make sure all your twists go in the same direction up the main line.
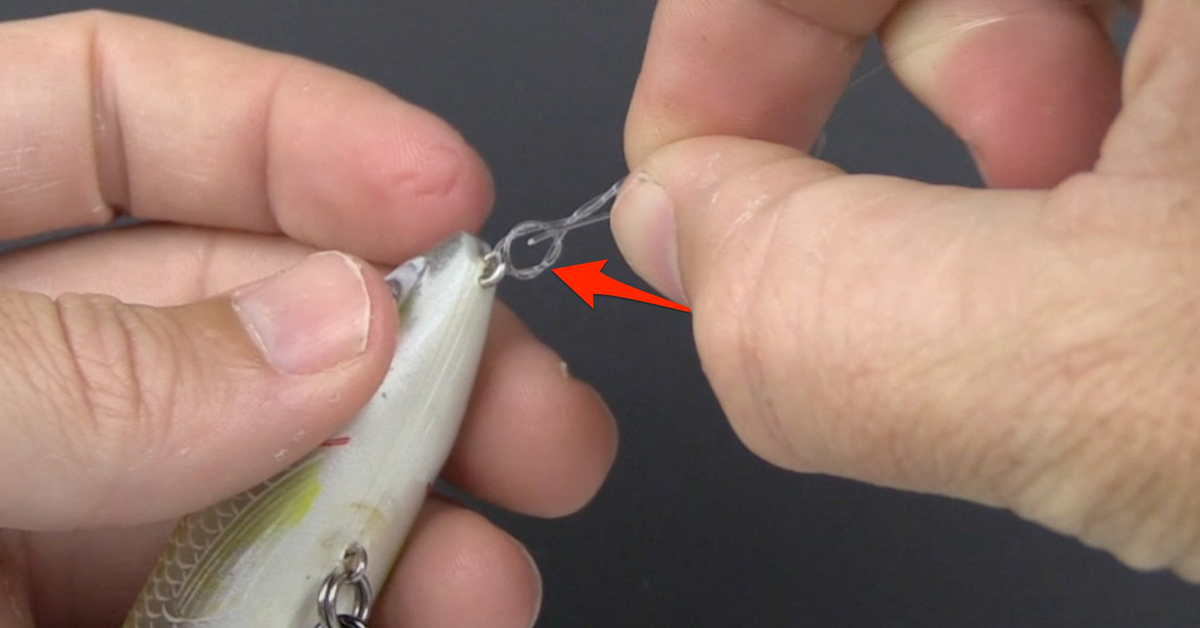
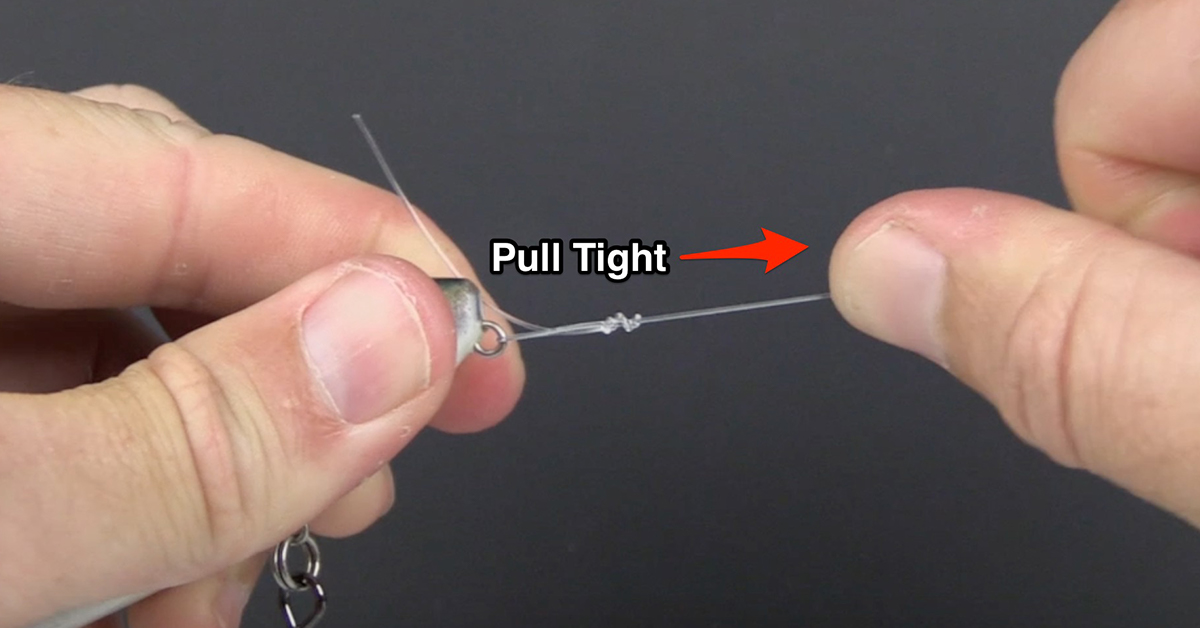
Step 5: Pull the Tag End Back Through the Loop
Pull the tag end from the top back through the upward facing side of the overhand loop. Pull the main line and tag end to make the knot finger tight.
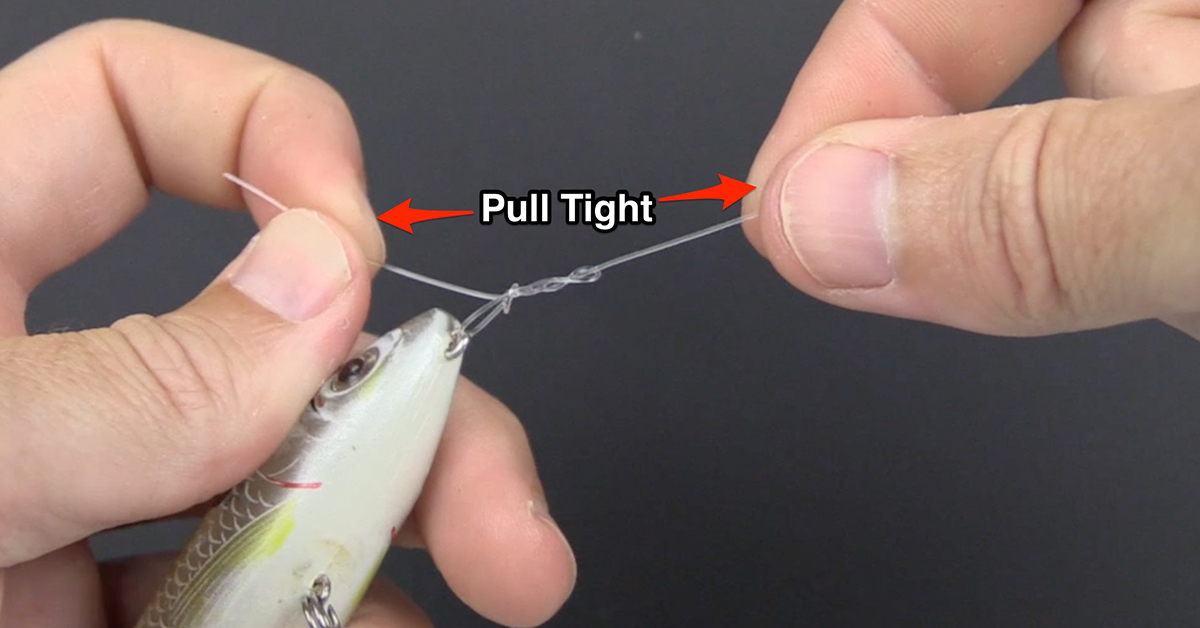
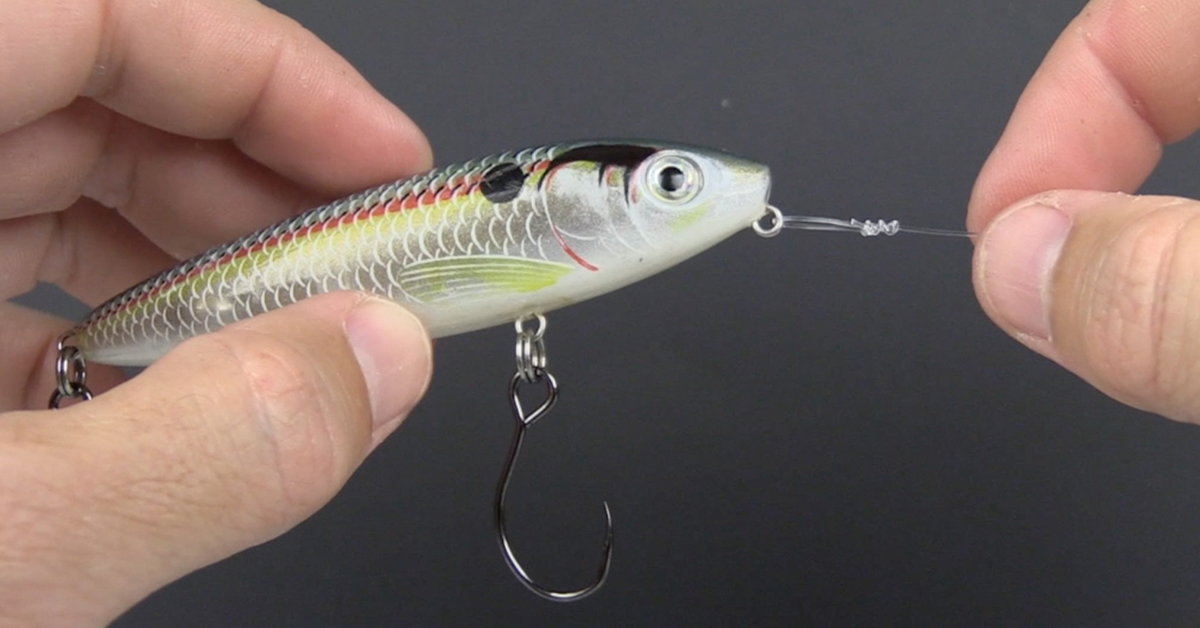
Step 6: Wet and Cinch Knot, Cut the Tag End
Wet the knot with either water or spit. Let go of the tag end and pull the main line tight to cinch the knot. Cut the tag end of the line. Your Non-Slip Loop Knot is now complete.
➡ CLICK HERE to get a FREE PDF guide showing all of these essential steps on tying this knot so that you can have a printout whenever you need it.
The Non-Slip Loop Knot Tutorial Video
The video below shows the entire process on how to tie the Non-Slip Loop Knot.
If you follow the directions in the video above, you’ll be able to the tie the non-slip loop knot like a pro.
However, every so often people make a mistake when tying this knot and it could lead to things such as a weaker knot, a less weedless knot, or even a knot that can get tangled up in the lure and pretty much guarantee that you won’t catch fish.
Check out the video below to see the most common non-slip loop knot mistakes.
3 Common Non-Slip Loop Knot Mistakes
Here are the three most common mistakes people make when tying this knot:
Mistake #1: They put the line through the wrong end of the loop.
When you do this, the tag end won’t point down neatly toward the lure, making it more weedless.
Instead, the tag end will stick out to the side, making it more prone to snag grass as you retrieve your lure.
Of course, if you snag grass, you most likely won’t catch any fish.
And not only that, but it will also make the knot weaker.
Mistake #2: Making the loop too big.
When you tie this knot, the loop should be about the size of an M&M.
If you make it too big, it could get tangled around the hook, lure, or jig head, also making it unlikely for you to catch fish.
Mistake #3: Using this knot for all purposes.
This knot should only be used when you’re using a lure that needs extra action and when the lure you’re tying to doesn’t have a split ring.
It’s great for tying to jig heads or hard plastics that don’t have split rings, but if you’re using live bait, or tying to a lure that does have a split ring, then you’re better off going with a snug knot, like the Palomar knot.
Conclusion
The Non-Slip Loop Knot is a knot that I think every angler should know.
It is incredibly strong and gives your lures and baits great action and movement.
While there are simpler loop knots you can tie, nothing compares to what the Non-Slip Loop Knot offers anglers.
If you want to learn more about the best fishing knots, check out our guide to the strongest fishing knots of all time.
If you have any questions or comments about this knot, let us know in the comments section below.
Tight Lines!
Go To Our Knot Testing Homepage [Full Knot Rankings]
➡ CLICK HERE to get a FREE PDF guide showing all of these essential steps on tying this knot so that you can have a printout whenever you need it.


Have you ever tested a San Diego jam knot? I’d be interested to see that if you ever get a chance to do that.I don’t know you got a lot more stuff to do.Thanks for posting these things.Though we do really appreciate it bye.For now
Maybe I’ve got a confidence problem, but I find myself reviewing this lesson from time to time just to check my own technique. This is such an important knot to learn.
a question came to me while watching you handle the lure… i know you handled it more than in a normal fishing situation since you were demoing tying the knot, but a general question is, what would you use to clean finger smudges, tackle box ‘gunk’, or whatever (scent) from the lure? Any recommendations?
I tied lots of these loop knots just like the video says and some are coming loose
Very nice info Luke 🤜🤛
For me the diffulculty is I don’t tie an overhand not the same as you. but when I looked at the trouble shooting video seeing that all lines must be on same side of loop made it easier as my lines were facing down not up so when I started bring my tag end up from bottom it fixed or made it eaier for me get it correct.
Link to pdf is broken.
Hi I was wondering if you just attached the lure then casted? Do u add anything else to the line?
Very difficult to tie with lower poundage fluoro. Took me about five tries with 8 lb and my loop is about double what it should be. Gonna go back and look at rapala knot. Recall that being pretty easy to tie and maybe use this for heavier poundages.
I find it a little hard to follow when you refer to the downward facing and upward facing loop. I watched someone else explain this knot and they described taking the tag end back through the loop in the same direction as it comes out of the loop. (Not sure I described that any clearer)