Do you commonly use slip float rigs to catch fish?
How do you set up a slip float rig if you never used it before?
Everything you need to know about different types of slip float rigs and how to set them up is down below!!
Learn more here!
How To Rig A Slip Float [VIDEO]
 Click here to join the Insider Club
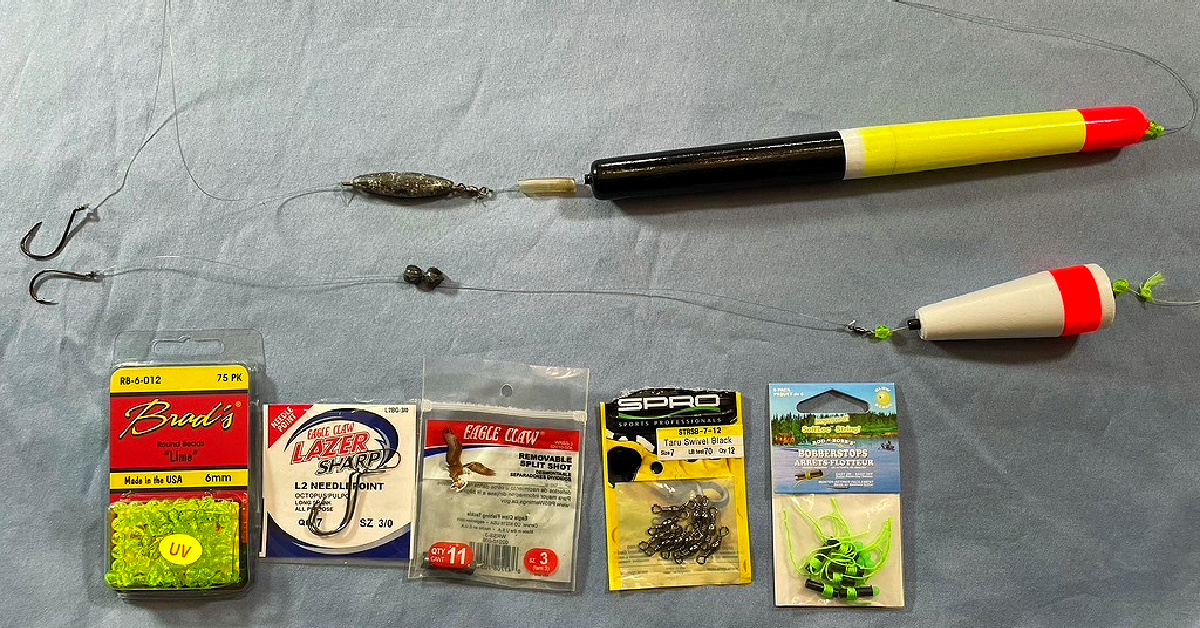
Featured Equipment:
- 30lb Stren Magnathin monofilament
- “Little Joe” Pole Float
- Standard styrofoam popping cork
- Gamakatsu 3/0 Octopus hook
- Eagle Claw 3/0 L2 needlepoint octopus hook
- Rod and Bob’s Bobberstops
- Brad’s Beads (6mm in Lime color)
- VMC Roling swivel (size 7 44lb test)
- Spro Taru Swivel (size 7 70lb test)
- Eagle Claw removable split shot weights (#3’s)
Rig #1
To start, the braid connecting from your rod to the top of the slip cork should be 10-15lb braided line.
A stronger line will help protect your float against rocks and anything that may cause abrasions.
Nail Knots, Bobberstops, & Beads
Along the braid is what is called your “Nail Knot” which slides up and down the braided line above the cork.
The purpose of this knot is to control the depth of your rig and fish your lures in the strike zone.
Bobberstops will perform the same function as the Nail Knot.
It is best to use material for the knot or bobberstops that are high visibility in brighter colors.
This way you can see exactly how deep the rig will swim in the water and the placement of the cork itself.
Moving down the line, just above your cork is a bead.
This is to stop the float before hitting the knot so the knot doesn’t slide through the float and alter the rig.
Beads that are 5mm or 6mm work best in brighter colors as well.
This way you are a lot less likely for a bead to jump over your knot.
You can also put another bead below the slip float to protect the plastic on the bottom of it.
Slip Floats
Slip floats are easy to slide onto your line and secure.
They are a fantastic choice for fishing live bait in about 6 feet of water or less.
Do not try to slide your line into the cork and tighten with the fastener that goes in the center of the float.
Instead, just put the end of your braided line right through the center hole of the slip float.
If you tighten it down in the traditional way, your float will not be able to slide up and down.
Knots & Leader
Knots are up to your personal preference but when attaching the system to the swivel below, an improved clinch knot is suggested.
You want to use a knot that is snug to the swivel that helps keep the entire system straight.
On the other end of the swivel, there is roughly 12 inches of monofilament leader.
The knot used to tie the monofilament onto the swivel is the same as the braid, an improved clinch knot, or any type of friction knot.
It is a smart idea to go a bit heavier on the leader material for this rig.
Around 30lb monofilament will be able to handle any structure on docks, rocks, or anything similar to these structures.
When connecting the monofilament line to the hook, the improved clinch knot comes into play again.
Anything that is a friction knot like the improved clinch will work great to secure your hook to your line.
Weights & Hooks
Bullet weights or pinch-on weights are best for this type of rig.
A total of 1/4 oz. of weight will work well in this system.
You do not want to overweight this rig because too much weight can affect the cork and it will not perform as well.
Out of the 12 inches of leader material, you want your weights about halfway between the cork and the hook.
If the weights are too far up the line and close to the cork, the rig will tangle and not fly correctly when you cast it out.
Make sure the bullet weights are closer to your hook than the end of the cork.
As far as hooks go, 3/0 hooks are the top option to use in this system.
Be sure to use Octopus-style hooks and not other types of hooks.
Octopus hooks are phenomenal live bait hooks and they are very sharp.
The hook point is slightly offset in comparison to the shank which sometimes makes fish hook themselves before you set the hook.
You do not have to set the hook as aggressively with this rig.
Just a straight retrieve down with a little bit of pressure will hook into the fish.
Pros & Cons Of Rig#1
Pros:
- Inexpensive to set up and rig
- Best for 6 feet or less
- Does not spook fish off as easily as other floats
- Great for redfish and trout in back bays and creeks
Cons:
- It is a lighter rig, which is tougher to use on windy days
- Will helicopter and tangle if you throw this rig into wind
- Limited casting distance
Rig #2 (Pole Float)
The Pole Float rig is very similar to the rig mentioned above, however, there are a few changes as far as terminal tackle.
Nail Knots & Beads
The same applies to this rig as mentioned above with regards to nail knots and beads.
You should use 10-15lb braided line that has a Nail Knot and a bead just below it.
Pole Floats
Pole Floats are best for deepwater fishing situations of 12-15 feet.
Make sure you are using a float that is no more than 3/4 oz. in weight.
This is because, for this rig, there is a heavier weight below the float.
Pole floats are a bit more pricey than slip floats and can range anywhere from $3 to $8 a float.
A piece of rubber tubing or a stopper below the float will help protect it.
Over time, the small plastic end of the pole float will wear away and get smashed in by the metal on the swivel.
You could use another bead below if you do not have any small rubber tubing.
Knots & Swivel Weights
Moving down the system, just as with the first rig mentioned, you should use a friction knot like the improved clinch knot to secure the braid to the swivel.
On the other end of the swivel, is a swivel weight weighing 1 1/4 oz.
It is much heavier than the rig above but this is used for 6 feet of water or more.
The heavier weight immediately puts your bait right into the strike zone quickly.
Another thing to note is that if you are fishing in windier, rougher conditions with waves and current, the heavier weight keeps the entire system in line and straight.
A heavier weight is also no problem for the pole floats because of how buoyant they are designed to be.
Going off of the swivel weight is another improved clinch knot leading into 12 inches of monofilament leader.
You do not want to make the leader too long because if you are using live bait like a minnow or a shrimp, you want it to be close to the weight and not have a wider range to swim.
This keeps your bait in the strike zone and quickens your response time to seeing the pole float be pulled underwater.
Moving down to the hook, you want to use a friction knot like the improved clinch knot again.
You do not want a loop knot down at the end connected to the hook.
If you are using live bait on a loop knot, the fish or shrimp can kick up and twist the line around itself.
Pros & Cons Of The Pole Float Rig
Pros:
- Super long casting distance with this rig
- Great for fishing in rougher conditions
- Best for deeper water scenarios
- The heavy weight puts your bait down into the strike zone quickly
Cons:
- Will be loud and spook fish in shallow water
Conclusion
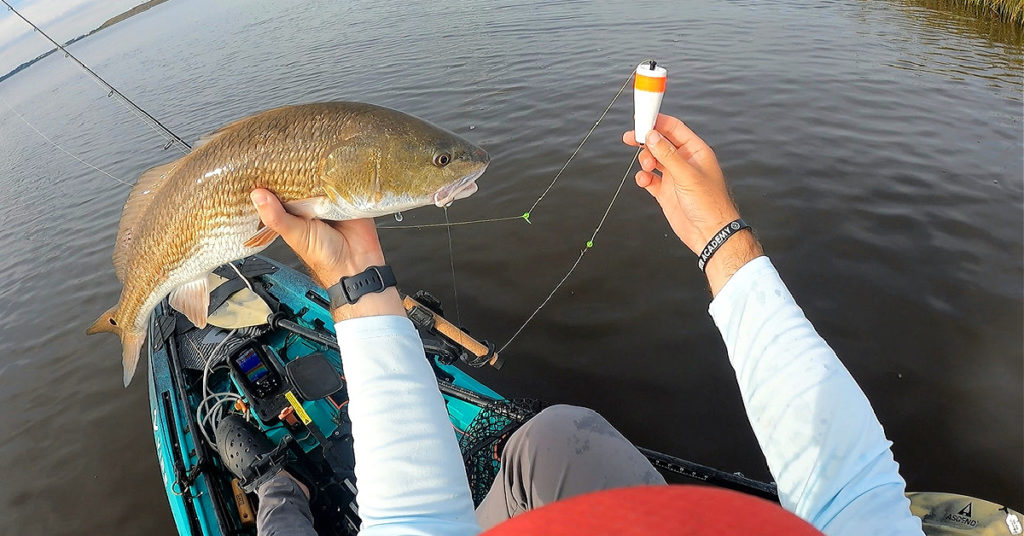
Slip float rigs are a great way to use live bait and put it directly into the strike zone that you want depending on water depth.
The two rigs discussed above are both excellent systems to set yourself up for success out on the water.
Be sure to know the depth of water you are fishing in before choosing one type of rig over the other!
If you have any more questions on slip float rigs, please ask me down in the comments!
And if you know someone who wants to learn more about wade fishing protection, please TAG or SHARE this with them!
P.S. Want access to our best fishing spots and tips, plus discounts to our online tackle store? Click here to join us in the Insider Club!
Related Articles:


Richard, really informative, especially with the pole float. I gotta try one in our windy Louisiana bayous. BTW, at 19:10, you mentioned your new company: FISHSTRONG…I crack me up…Thanks…
Looking forward to trying this. I am a bit baffled by the Nail Knot… I watched some videos on tying it but am even more confused in light of your application. Any advice on tying it? Thx
I typically buy the pre made ones that I showed here in the video, or I just tie a double overhand or square knot with heavy braid.
Great ! Thx..appreciate it.
No problem Wayne!
I fish with 10 lb braid and it’s so small that sometimes with the bobber stopper cinched down tightly the bead will slip over it. I’ve found that putting a second stopper over the first works well
I prefer non weighted bobbers as I fish around a lot of structure. If the bobber is held vertical by the weight I know my rig is off the bottom and less likely to snag. I also put my split shots closer to the hook. If the float is horizontal then it’s dragging.
Great Tips Vic!
Thill brand weighted slip bobbers are a really nice option, they are all I use. This is my favorite rig for live bait for sure.
Awesome information Jacob, I’ll have to check them out!
Question: I’m seeing you tie your offset eye hooks with a knot other than a snell.
Is there some reason that you are not snelling the hooks? With the offset eyes it appears to be begging for a snell. I ask because I always snell and I’m protecting my ego…ha.
Great question Gary, a snell knot would be a great alternative! I just tie the improved clinch for speeds sake. It’s one I have a lot of confidence in and can still tie in a matter of seconds.
I do believe the snell has bit better breaking strength if I remember correctly.
Excellent presentation Richard.
We have been using this system in Winyah Bay, SC for years with a lot of success.
We either use live shrimp or mud minnows as bait depending on the time of year and the species that we are fishing for.
We tend to use bright orange or chartreuse floats because our water is tannin stained
and the more colorful the float the better.
But basically you can use almost any inexpensive float.
They also make floats that are weighted at the bottom and they also work very well
Thanks David, it’s one of my favorite ways to fish, especially in the southeast.
So how do you pop the cork if the line slides through it?
Bob, you don’t really pop this rig. The concept is to allow the float to slip up and down the line so you can choose your depth.
Thanks. You could pop it with the original depth but if you increased the depth there will be slack in line but may still work – will try it to see.
I am able to do a light pop when the nail knot is closer to the cork if I’m fishing shallow, but eventually I have seen it push the knot back some over time. I’m sure adding 2 knots would hold it better.
Fortunately with live bait you seldom have to impart much action to get a strike.
Going to try the pole float offshore to float shrimp over rocks for mangroves. I found a couple this week on close out for $3. Thanks for the video
They are a great way to catch mangroves, especially since they like structure and current. Good luck!
Excellent! Thank you!
Of course Bill!
Have you considered using a Palomar Knot when possibe, since it’s a 100% knot and does Not Slip when used with braid.
William, I have, but I’ve used the modified Clinch so much and I can tie it very quickly and is a great knot so I never switched. I’d go with the one you have the most confidence in and can tie quickly!